 IoT
IoT ESP32-C6 Matter Smart Home Guide 2026: $5 Thread Border Router Setup
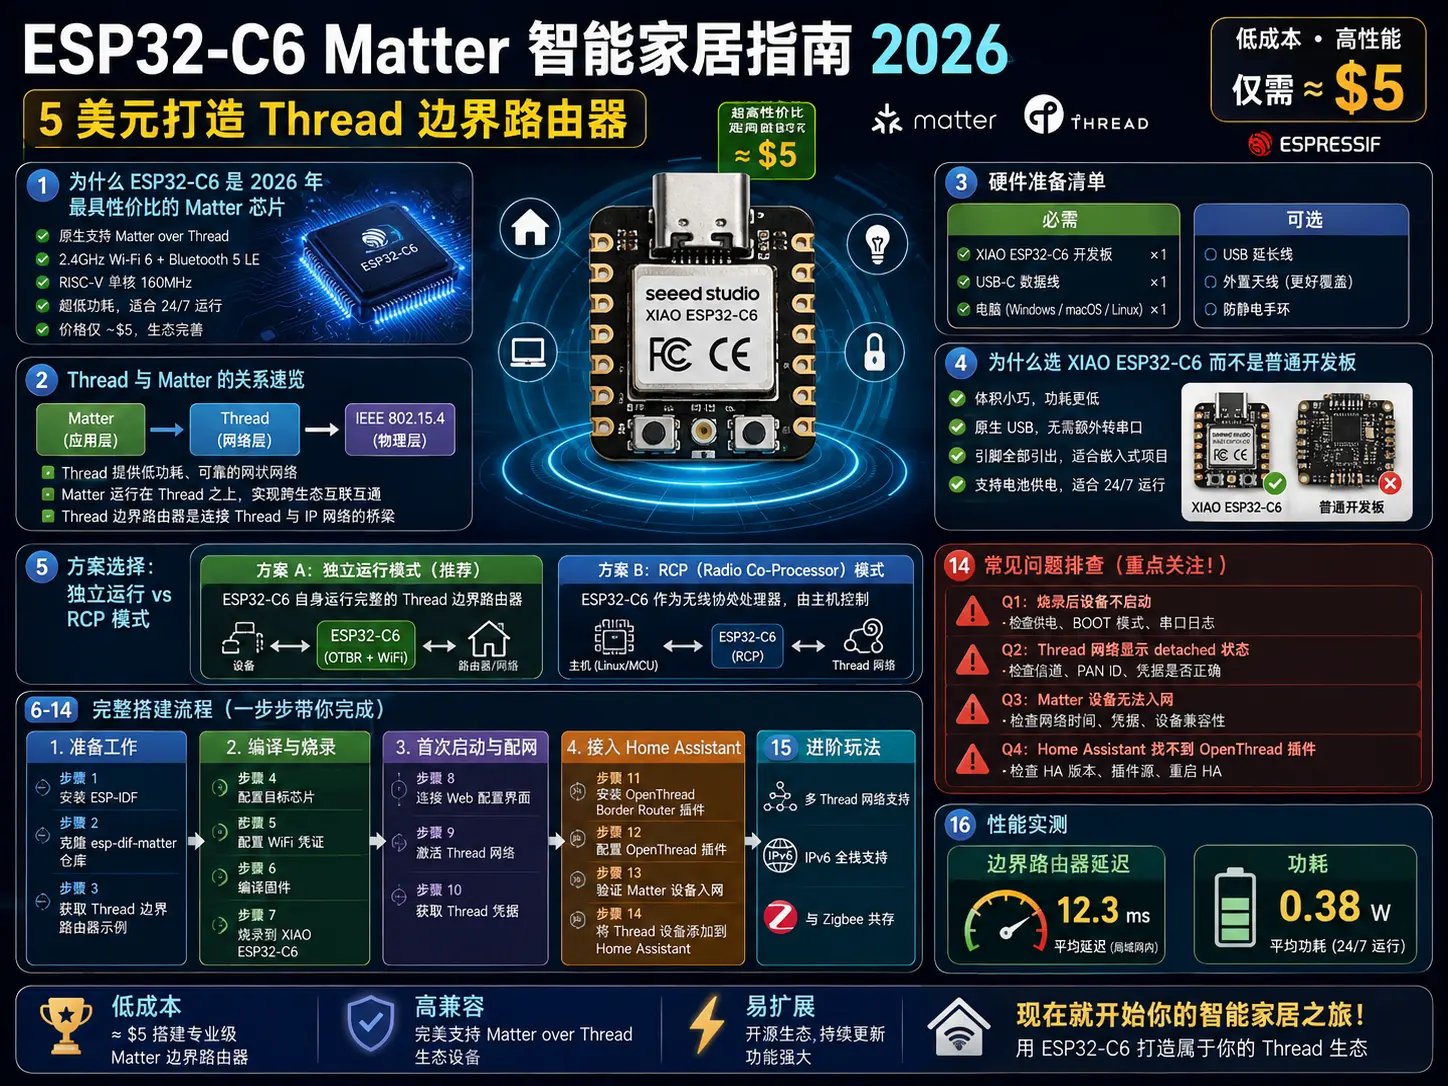
Why ESP32-C6 Is the Best Budget Matter Chip in 2026
The ESP32-C6 has become the go-to chip for Matter smart home projects in 2026. At just $5 (Seeed Studio XIAO ESP32-C6), it packs dual connectivity — WiFi 6 (802.11ax) and IEEE 802.15.4 (Thread/Zigbee) — into a single RISC-V SoC. This means you can build a complete Matter-compatible smart home hub without buying separate radios.
Three key advantages make the ESP32-C6 stand out:
- Dual radio on one chip — WiFi for backbone connectivity + 802.15.4 for low-power Thread mesh networking
- RISC-V architecture — Lower power consumption than older Xtensa-based ESP32 variants
- Full ESP-Matter SDK support — Espressif’s official SDK with production-ready Matter device types
In this guide, you’ll learn how to turn a $5 ESP32-C6 board into a standalone Thread Border Router that connects Matter/Thread devices to Home Assistant — with no USB data cable, no Raspberry Pi, and no extra hardware.
What You’ll Need
Hardware:
- Seeed Studio XIAO ESP32-C6 (~$5-$10) — recommended for compact size and decent range
- Any ESP32-C6 dev board with USB-C works (ESP32-C6-DevKitM, WeAct ESP32-C6, etc.)
- USB-C cable (charge-only is fine after initial flashing)
- A computer for one-time firmware flashing
Software:
- ESP-IDF v5.4.2 (Espressif’s official development framework)
- Home Assistant with Matter Server add-on installed
- A router with IPv6 support (mandatory for Thread/Matter)
For testing:
- Any Matter-over-Thread device (IKEA Alpstuga, Nanoleaf Essentials bulbs, Eve Energy, etc.)
Two Approaches: RCP vs Standalone Border Router
Before diving in, understand the two ways to use ESP32-C6 with Matter:
Approach 1: USB RCP (Radio Co-Processor)
The common $5 border router guide uses ESP32-C6 as a USB radio dongle plugged into a Raspberry Pi or Home Assistant server. The host machine runs OpenThread Border Router (OTBR) software, and the ESP32-C6 just handles 802.15.4 radio communication.
Pros: Simple setup, well-documented Cons: Requires a host computer running 24/7, USB cable always connected
Approach 2: Standalone Native Border Router (This Guide)
Our approach runs all Thread intelligence directly on the ESP32-C6 — no host computer needed. The board connects to WiFi, runs the Thread stack, and exposes a REST API that Home Assistant discovers automatically via mDNS.
Pros: Truly standalone, no USB data connection, ultra-low power, runs off any USB power adapter Cons: More complex initial setup, requires IPv6 network knowledge, limited by onboard antenna range
Step 1 — Install ESP-IDF v5.4.2
ESP-IDF is Espressif’s official IoT development framework. Version 5.4.2 is critical — other versions may conflict with the OpenThread toolchain.
Windows:
Download the ESP-IDF Windows Installer from github.com/espressif/esp-idf. During installation, select ESP32-C6 as the target chip.
Linux / macOS:
git clone -b v5.4.2 --recursive https://github.com/espressif/esp-idf.git
cd esp-idf
./install.sh esp32c6
Important: Always activate the environment before building:
cd path/to/esp-idf
. ./export.sh   # Linux/macOS
# or
export.bat      # Windows
Step 2 — Prepare the Border Router Firmware
Navigate to the OpenThread Border Router example:
cd examples/openthread/ot_brYou’ll need to modify three files from the esp32c6-thread-border-router project:
partitions_4mb_otbr.csv— Custom partition table for 4MB flashsdkconfig.defaults— Append (don’t replace) WiFi + Thread configurationmain/esp_ot_br.c— Custom main source with REST API and mDNS support
Set the build target and configure WiFi:
idf.py set-target esp32c6
idf.py menuconfig
In menuconfig, navigate to:
- Example Configuration → Set your WiFi SSID and password
- Component config → OpenThread → Thread Core Features → Select “Native 15.4 radio”
- Serial flasher config → Flash size → 4 MB
Save (S) and quit (Q).
Step 3 — Build and Flash
Connect your ESP32-C6 via USB, then build and flash:
# Linux / macOS
idf.py build flash -p /dev/ttyUSB0 monitor

# Windows (replace COM port)
idf.py build flash -p COM11 monitor
First build takes ~10 minutes. After flashing, watch the serial monitor — within 20 seconds you should see:
I (12345) openthread: Connected to WiFi
I (12346) openthread: IPv6 address: fd55:ec6e:b588::1
I (12347) openthread: REST API listening on port 8080
Step 4 — Verify the REST API
Check your router’s DHCP list for the ESP32-C6’s IP address. Then test these endpoints:
# Check node state (4 = leader/router)
curl http://<ESP_IP>:8080/node
# Expected: {"State":4}

# Check active Thread dataset
curl http://<ESP_IP>:8080/networks/dataset/active
# Expected: {"ActiveDataset":"0e08..."}
If both return valid JSON, your standalone border router is operational.
Step 5 — Connect to Home Assistant
This is where the magic happens — Home Assistant auto-discovers your ESP32-C6 border router via mDNS.
Add the Thread network dataset:
- Go to Settings → System → Thread in Home Assistant
- Your ESP border router should appear automatically
- Click it and add the Thread dataset
Sync Thread credentials to your phone:
- Install the Home Assistant Companion app
- Go to Settings → Companion App → Troubleshooting → Sync Thread credentials
Commission a Matter device:
- Go to Settings → Devices & Services → Add Integration → Matter
- Scan the QR code on your device or enter the manual setup code
- The device joins the Thread network through your ESP32-C6 border router
- It appears in Home Assistant as a controllable entity
Critical: IPv6 Network Requirements
Thread/Matter requires end-to-end IPv6 connectivity. This is the #1 reason Matter setups fail.
Disable NAT66
Your router must NOT use NAT66. Matter commissioning uses direct IPv6 — if packets are being NAT’d, commissioning will fail.
Home Assistant in a VM
If running Home Assistant in a VM (Proxmox, VMware, etc.), use bridged networking — not NAT. The VM must be on the same network segment as the ESP32-C6.
Static Route (If Needed)
If your router doesn’t propagate Router Advertisements from the ESP32-C6, add a static IPv6 route:
- Destination: Your Thread prefix (e.g.,
fd55:ec6e:b588::/48— check your dataset) - Gateway: ESP32-C6’s link-local IPv6 address (visible in your router’s neighbor table)
pfSense Specific
- Add a static IPv6 gateway pointing to the ESP’s link-local address
- Add a firewall rule on LAN (above the default IPv6 block rule) routing the Thread prefix via the ESP gateway
- Disable NAT66 globally
Troubleshooting Common Issues
WiFi Won’t Connect
- Double-check SSID and password in menuconfig
- The onboard PCB antenna has limited range — keep ESP32-C6 within 5m of your router
- Signal below -85 dBm causes instability when Thread coexists with WiFi
Build Fails with Tool Version Error
You likely have multiple ESP-IDF versions. Always start from a fresh terminal and activate the v5.4.2 environment before running idf.py.
LAN IPv6 Breaks When ESP Powers On
The ESP’s border routing manager sends Router Advertisements that can conflict with your router. The firmware’s suppress_backbone_ra_task handles this after ~20 seconds. If issues persist, verify otBorderRouterRemoveOnMeshPrefix is called in the logs.
Matter Commissioning Timeout
- Ensure NAT66 is disabled on your router
- Verify end-to-end IPv6:
ping6 <thread-device-ip>from your HA machine - Check that Thread dataset in HA matches the ESP’s active dataset
Compatible Matter-over-Thread Devices (2026)
The ESP32-C6 border router works with any certified Matter-over-Thread device:
- IKEA Alpstuga — Air quality sensor (PM2.5, VOC, temperature, humidity)
- IKEA Inspektionsblad — Plant sensor
- Nanoleaf Essentials — Smart bulbs (A19, GU10, Lightstrip)
- Eve Energy — Smart plug with power monitoring
- Eve Door & Window — Contact sensor
- Aqara U200 — Smart lock
- SwitchBot Bot — Smart button (Matter version)
- Apple HomePod mini — Also acts as a Thread border router (can coexist)
ESP32-C6 vs ESP32-H2 for Matter
| Feature | ESP32-C6 | ESP32-H2 |
|---|---|---|
| WiFi | ✅ 802.11ax (WiFi 6) | ❌ None |
| Thread/Zigbee | ✅ 802.15.4 | ✅ 802.15.4 |
| CPU | RISC-V 160MHz | RISC-V 96MHz |
| Standalone border router | ✅ Yes | ❌ No (needs WiFi host) |
| Price | ~$5 | ~$4 |
Bottom line: ESP32-C6 is better for border routers (has WiFi). ESP32-H2 is fine for end devices (sensors, switches) that only need Thread.
Next Steps
Your $5 ESP32-C6 is now a fully functional Matter border router. From here you can:
- Expand your Thread mesh — Add more ESP32-H2 devices as Thread end nodes
- Build custom Matter devices — Use ESP-Matter SDK to create your own sensors and actuators
- Add a second border router — Improve Thread network reliability with redundancy
- Explore ESP32-C6 WiFi 6 — Use the WiFi 6 radio for low-power connected sensors alongside Thread
For our next article in this series, we’ll explore ESP32 Computer Vision projects — a breakout keyword with +216,250% search growth. Stay tuned.