 IoT
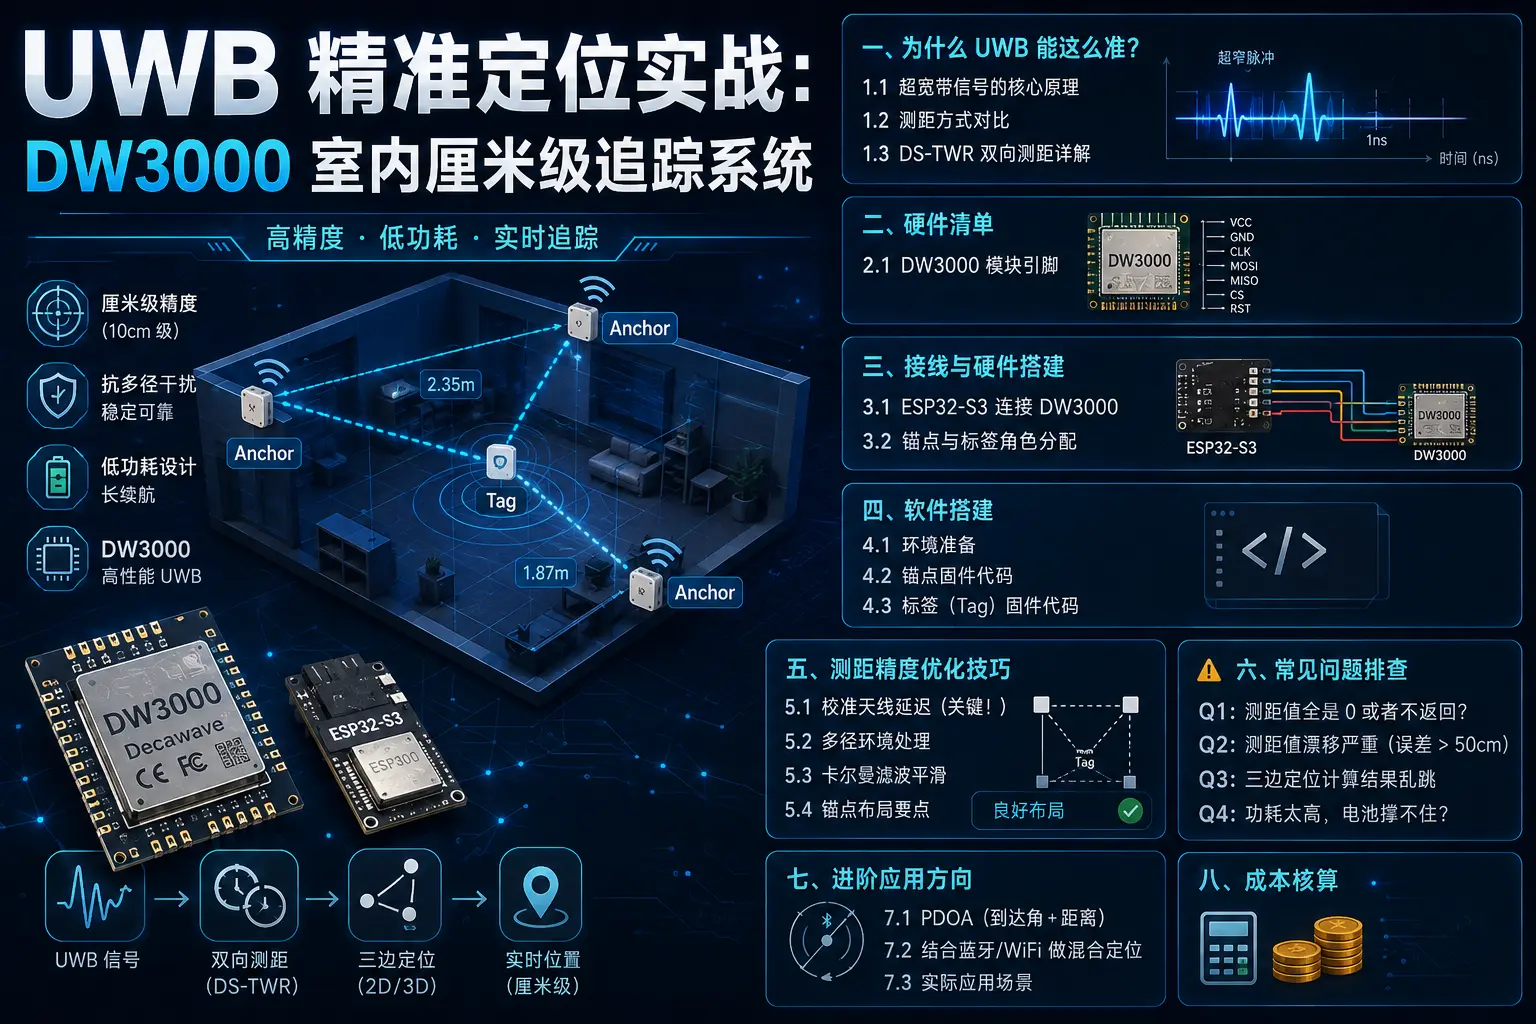
IoT UWB Precision Positioning in Practice: DW3000 Indoor Centimeter-Level Tracking System
GPS works great outdoors, but once you go indoors — warehouses, factories, underground parking lots — GPS signals basically give up. What do you do? Enter UWB (Ultra Wideband) technology to the rescue.
UWB positioning accuracy can reach 10-30 centimeters, far surpassing the meter-level accuracy of WiFi, Bluetooth, and Zigbee. With DW3000 chip modules now dropping below 100 RMB, even hobbyist DIYers can build centimeter-level positioning systems. Today we’ll build an indoor centimeter-level tracking system from scratch using ESP32 + DW3000.
1. Why Is UWB So Accurate?
1.1 Core Principles of Ultra-Wideband Signals
Traditional narrowband communication (like WiFi, Bluetooth) uses a very narrow frequency band — the signal is like a thin laser beam. UWB, on the other hand, transmits nanosecond-level pulse signals across an ultra-wide band from 3.1 GHz to 10.6 GHz — the signal is more like a spread-out burst of light.
This characteristic provides two direct benefits:
- Extremely high time resolution: Nanosecond pulses = speed of light × 1ns ≈ 30cm distance resolution
- Strong multipath resistance: Short pulses are unlikely to overlap with reflected signals, providing strong penetration
Simply put, WiFi ranging relies on signal strength (RSSI), which is heavily affected by the environment; UWB relies on signal time-of-flight (ToF), which is physically more precise.
1.2 Ranging Method Comparison
| Ranging Method | Principle | Accuracy | Latency |
|---|---|---|---|
| RSSI | Signal strength attenuation estimation | 3-5 meters | Low |
| AOA/AOD | Signal angle of arrival | 1-2 meters | Medium |
| TWR (Two-Way Ranging) | Round-trip time of flight | 10-30 cm | Medium |
| TDoA | Time difference of arrival | 10-50 cm | Low |
Two-Way Ranging (TWR) is our focus for today.
1.3 DS-TWR Two-Way Ranging Explained
The DW3000 supports DS-TWR (Double-Sided Two-Way Ranging), with the following process:
Device A                        Device B
  |                              |
  | ---- Poll (sent at t1) ----> |
  |                              | t2 (received)
  |                              |
  | <--- Response (sent at t3) - |
  | t4 (received)                |
  |                              |
  | ---- Final (sent at t5) ---> |
  |                              | t6 (received)
  |                              |
Distance calculation formula:
Round Trip Time A = t4 - t1
Round Trip Time B = t6 - t3

Reply Time A = t5 - t4
Reply Time B = t3 - t2

Time of Flight ToF = (RT_A × RT_B - Reply_A × Reply_B) / (RT_A + RT_B + Reply_A + Reply_B)

Distance = ToF × Speed of Light / 2
The elegance of DS-TWR lies in performing two round-trip measurements, which cancels out clock offsets between devices, resulting in accuracy an order of magnitude higher than single-sided TWR.
2. Bill of Materials
| Component | Model | Quantity | Reference Price |
|---|---|---|---|
| Dev board | ESP32-S3 DevKit | 4 | ¥25/board |
| UWB module | DWM3000 (DW3000 chip) | 4 | ¥80-120/board |
| Antenna | UWB PCB antenna (built into module) | - | Integrated |
| Wiring | SPI jumper wires / pin headers | Various | ¥5 |
| Power supply | 5V 2A adapter × 3 | 3 | ¥10 each |
| Mounting bracket | 3D printed bracket | 3 sets | Self-made |
Why 4 boards? 3 serve as anchors, 1 as a tag — that’s all you need for trilateration positioning. The extra one is a spare — useful as a test anchor during debugging.
2.1 DW3000 Module Pinout
DW3000 modules typically have 12 pins. The core ones we use:
| Pin | Function | Description |
|---|---|---|
| VCC | Power | 3.3V (note: NOT 5V) |
| GND | Ground | Common ground must be reliable |
| SCK | SPI clock | Up to 38MHz |
| MOSI | SPI master output | |
| MISO | SPI master input | |
| CS | SPI chip select | Active low |
| IRQ | Interrupt output | TX/RX complete notification |
| WAKEUP | Wakeup | Low-power wake pin |
| RESET | Reset | Active low reset |
3. Wiring and Hardware Setup
3.1 Connecting ESP32-S3 to DW3000
The ESP32-S3 connects to the DW3000 via SPI. Wiring as follows:
ESP32-S3          DWM3000
────────          ───────
3V3       ───→    VCC
GND       ───→    GND
GPIO10    ───→    CS   (Chip select)
GPIO11    ───→    SCK  (Clock)
GPIO12    ───→    MOSI (Master output)
GPIO13    ───→    MISO (Master input)
GPIO14    ───→    IRQ  (Interrupt)
GPIO15    ───→    RST  (Reset)
3.2 Anchor and Tag Role Assignment
          Anchor 1 (0, 0)
              ●
             / \
            /   \
           /     \
          /       \
   Anchor 2 ────── Anchor 3
   (5, 0)  ●────────● (2.5, 4.33)
             \
              \
               \
                ● Tag (moving target)
Trilateration requires at least 3 anchors with known precise coordinates. The tag measures distance to each anchor, then calculates its own position through geometric computation.
4. Software Setup
4.1 Environment Preparation
Using PlatformIO + Arduino framework:
# Install PlatformIO
pip install platformio

# Create project
pio init --board esp32-s3-devkitc-1 --project-option "framework=arduino"
Add DW3000 dependencies in platformio.ini:
[env:esp32-s3]
platform = espressif32
board = esp32-s3-devkitc-1
framework = arduino
lib_deps =
    thotlabs/DWM3000 @ ^1.0.0
    bblanchon/ArduinoJson @ ^6.21.0
monitor_speed = 115200
upload_speed = 921600
4.2 Anchor Firmware Code
#include <Arduino.h>
#include <SPI.h>
#include <DWM3000.h>

// ============ SPI Pin Definitions ============
#define DW3000_CS   10
#define DW3000_IRQ  14
#define DW3000_RST  15

// ============ Anchor Coordinates (meters) ============
#define ANCHOR_X  0.0
#define ANCHOR_Y  0.0
#define ANCHOR_Z  1.2  // Mounting height 1.2m

// ============ Anchor Addresses ============
// Each anchor needs a unique short address
#define THIS_ADDR   0x0001
#define ANCHOR_2    0x0002
#define ANCHOR_3    0x0003

DWM3000 dwm;
uint8_t this_address[] = {0x01, 0x00};
bool is_anchor = true;

void setup() {
  Serial.begin(115200);
  delay(1000);
  Serial.println("=== DWM3000 Anchor Boot ===");
  Serial.printf("Anchor ID: 0x%04X, Position: (%.2f, %.2f, %.2fm)\n",
                THIS_ADDR, ANCHOR_X, ANCHOR_Y, ANCHOR_Z);

  // SPI initialization
  SPI.begin(11, 13, 10);  // SCK, MISO, CS
  dwm.begin(DW3000_CS, DW3000_IRQ);
  dwm.reset();
  dwm.setDeviceAddress(this_address, 2);

  // Configure UWB channel (Channel 5, PRF 64MHz)
  dwm.setChannel(5);
  dwm.setPreambleCode(10);
  dwm.setPreambleLength(DW_PREAMBLE_LEN_128);
  dwm.setDataRate(DW_DATARATE_6M8);

  Serial.println("DWM3000 initialized, ready for ranging...");
}

void loop() {
  // Listen for Poll messages from the Tag
  if (dwm.available()) {
    uint8_t source_addr[2];
    float distance;

    // Receive and process
    dwm.read(source_addr, 2);
    distance = dwm.getDistance();

    Serial.printf("[%.3f] Distance to Tag: %.3f m\n",
                  millis() / 1000.0, distance);

    // Report distance data via Serial or WiFi
    Serial.printf("RANGE:%d:%.3f:%.3f:%.3f\n",
                  THIS_ADDR, ANCHOR_X, ANCHOR_Y, distance);

    dwm.clearInterrupt();
  }
}
4.3 Tag Firmware Code
#include <Arduino.h>
#include <SPI.h>
#include <DWM3000.h>
#include <ArduinoJson.h>

#define DW3000_CS   10
#define DW3000_IRQ  14
#define DW3000_RST  15

// Tag address
uint8_t tag_address[] = {0x10, 0x00};

// Three anchor short addresses
uint16_t anchors[] = {0x0001, 0x0002, 0x0003};
float distances[3] = {0, 0, 0};

// Anchor coordinates
float anchor_x[] = {0.0, 5.0, 2.5};
float anchor_y[] = {0.0, 0.0, 4.33};

DWM3000 dwm;
unsigned long last_ranging = 0;
const unsigned long RANGING_INTERVAL = 200;  // Range every 200ms

void setup() {
  Serial.begin(115200);
  delay(1000);
  Serial.println("=== DWM3000 Tag Boot ===");

  SPI.begin(11, 13, 10);
  dwm.begin(DW3000_CS, DW3000_IRQ);
  dwm.reset();
  dwm.setDeviceAddress(tag_address, 2);

  dwm.setChannel(5);
  dwm.setPreambleCode(10);
  dwm.setPreambleLength(DW_PREAMBLE_LEN_128);
  dwm.setDataRate(DW_DATARATE_6M8);

  Serial.println("Tag ready, starting ranging...");
}

/**
 * Trilateration algorithm (simplified least squares)
 * Calculate 2D coordinates from distances to three anchors
 */
void calculatePosition() {
  // Build equation system and solve
  // Simplified: assume all anchors are on the same plane (z=0)
  float A_mat[3][3] = {
    {2*(anchor_x[1]-anchor_x[0]), 2*(anchor_y[1]-anchor_y[0]), 0},
    {2*(anchor_x[2]-anchor_x[0]), 2*(anchor_y[2]-anchor_y[0]), 0},
    {1, 1, 0}
  };

  float B_vec[3] = {
    pow(distances[0], 2) - pow(distances[1], 2)
    - pow(anchor_x[0], 2) + pow(anchor_x[1], 2)
    - pow(anchor_y[0], 2) + pow(anchor_y[1], 2),

    pow(distances[0], 2) - pow(distances[2], 2)
    - pow(anchor_x[0], 2) + pow(anchor_x[2], 2)
    - pow(anchor_y[0], 2) + pow(anchor_y[2], 2),

    1  // Weight
  };

  // Gaussian elimination solver (2x2 system)
  float det = A_mat[0][0] * A_mat[1][1] - A_mat[0][1] * A_mat[1][0];
  if (abs(det) < 0.001) {
    Serial.println("⚠️  Trilateration degenerate (anchors collinear)!");
    return;
  }

  float x = (B_vec[0] * A_mat[1][1] - B_vec[1] * A_mat[0][1]) / det;
  float y = (A_mat[0][0] * B_vec[1] - A_mat[1][0] * B_vec[0]) / det;

  // Output result in JSON format
  StaticJsonDocument<256> doc;
  doc["x"] = x;
  doc["y"] = y;
  doc["dist_a1"] = distances[0];
  doc["dist_a2"] = distances[1];
  doc["dist_a3"] = distances[2];

  char buf[256];
  serializeJson(doc, buf);
  Serial.printf("POSITION: %s\n", buf);
}

void loop() {
  unsigned long now = millis();
  if (now - last_ranging < RANGING_INTERVAL) return;
  last_ranging = now;

  // Range to each of the three anchors in sequence
  for (int i = 0; i < 3; i++) {
    dwm.startRanging(anchors[i]);

    // Wait for ranging to complete (max 100ms)
    unsigned long start = millis();
    while (!dwm.rangingComplete() && (millis() - start < 100)) {
      delay(1);
    }

    if (dwm.rangingComplete()) {
      distances[i] = dwm.getDistance();
      Serial.printf("Anchor %d: %.3f m\n", i + 1, distances[i]);
    } else {
      Serial.printf("Anchor %d: TIMEOUT\n", i + 1);
      distances[i] = -1;  // Mark as failed
    }
  }

  // Only calculate position if all three distances are valid
  bool all_valid = true;
  for (int i = 0; i < 3; i++) {
    if (distances[i] < 0) all_valid = false;
  }

  if (all_valid) {
    calculatePosition();
  } else {
    Serial.println("⚠️  Incomplete distance data, skipping position calculation");
  }
}
5. Ranging Accuracy Optimization Tips
The DW3000 is rated at 10cm accuracy, but in practice you might find jitter reaching 50cm or even 1m. Don’t worry — follow these steps to troubleshoot and optimize:
5.1 Calibrate Antenna Delay (Critical!)
The internal routing of the DW3000’s antenna introduces a fixed delay that must be calibrated, otherwise your ranging will have a systematic offset.
// Calibrate TX antenna delay at a known distance of 1.0m
// Factory default is usually 16626 (Channel 5)
// Needs to be adjusted based on actual measurements
dwm.setTxAntennaDelay(16626);
dwm.setRxAntennaDelay(16626);

// Calibration procedure:
// 1. Place two modules at precisely 1.0m apart
// 2. Read the measured value, e.g. it reads 1.15m
// 3. Adjust the delay value until the reading approaches 1.0m
// Empirical formula: new_delay = old_delay × (actual_distance / measured_distance)
5.2 Handling Multipath Environments
// Enable First Path Power detection
// Helps distinguish direct signals from reflected signals
dwm.setRXMode(DW_RX_MODE);
dwm.enableFirstPathDetection(true);

// Set receive sensitivity threshold
// Lower values = more sensitive, but also more false positives
dwm.setRXThreshold(10);
5.3 Kalman Filter Smoothing
Raw ranging data has jitter — applying a Kalman filter can smooth it significantly:
// Simplified Kalman filter
float kalman_filter(float measurement, float &estimate,
                    float &error, float processNoise,
                    float measurementNoise) {
  // Predict
  float prediction = estimate;
  float predError = error + processNoise;

  // Update
  float gain = predError / (predError + measurementNoise);
  estimate = prediction + gain * (measurement - prediction);
  error = (1 - gain) * predError;

  return estimate;
}

// Usage in loop()
float raw_distance = dwm.getDistance();
float smoothed_distance = kalman_filter(
    raw_distance, estimate, error, 0.01, 0.1);
5.4 Anchor Layout Guidelines
❌ Wrong layout (collinear):

  A1 ●────● A2 ────● A3
     Three anchors on the same line → positioning results severely skewed

✅ Correct layout (triangle):

          A1 ●
            / \
           /   \
          /     \
   A2 ● ──────── ● A3
   Triangular layout → best positioning accuracy
Golden rules:
- Anchor spacing ≥ 3m, the larger the better
- Consistent anchor heights (recommended 1.2-1.5m)
- Keep metal objects away from antennas (at least 50cm)
- Minimize obstructions between tag and anchors
6. Common Troubleshooting
Q1: Ranging values are all 0 or not returning?
Possible causes:
- SPI wiring errors or CS pin conflicts
- DW3000 module underpowered (needs stable 3.3V)
- Chip select pin not pulled low
Troubleshooting steps:
// Add SPI communication diagnostics
void diag_spi() {
  uint8_t dev_id[2];
  dwm.readDeviceId(dev_id, 2);
  Serial.printf("Device ID: 0x%02X%02X\n", dev_id[0], dev_id[1]);
  // DW3000 Device ID should be 0xDECA03xx
}
Q2: Ranging values drifting severely (error > 50cm)
- Check antenna delay calibration (most common pitfall)
- Confirm both modules use the same channel number (Channel 5)
- Check for nearby 2.4GHz WiFi routers (interference)
- Lower data rate to
DW_DATARATE_850Kto increase reliability - Ensure antenna orientations are consistent between modules
Q3: Trilateration results jumping around erratically
- Check if anchors are collinear (use
detto check — close to 0 means collinear) - Add weights to each ranging value (closer distance = higher weight)
- Introduce a fourth anchor for redundant verification
- Use EKF (Extended Kalman Filter) instead of simple trilateration
Q4: Power consumption too high, battery can’t keep up?
// Enable DW3000 deep sleep
dwm.enterSleep();  // Sleep current ~32μA
delay(5000);        // Wake after 5 seconds
dwm.wakeup();

// On the tag side: wake on demand for ranging
// Trigger ranging via external interrupt (button/sensor)
// Or use an ultra-low-power timer (LPUART) for periodic wake-ups
7. Advanced Application Directions
7.1 PDOA (Angle of Arrival + Distance)
The DW3000 paired with dual antennas can measure signal angle of arrival (Phase Difference of Arrival):
// Enable PDOA mode
dwm.setPDMode(DW_PDOA_MODE_3);  // Mode 3 = returns both distance + angle
float angle = dwm.getPhaseDiff();  // Unit: degrees
With angle information, theoretically just two anchors are needed for positioning — one fewer than trilateration.
7.2 Hybrid Positioning with Bluetooth/WiFi
Outdoors → GPS
Transition zones → Bluetooth AOA
Indoors → UWB DW3000
By fusing multi-source sensor data with Kalman filtering, you can achieve seamless indoor-outdoor positioning.
7.3 Real-World Application Scenarios
- Warehouse asset tracking: Real-time location monitoring of forklifts, pallets
- Factory safety: Automatic alerts when personnel approach dangerous areas
- Smart home: Detect which room someone is in, auto-switch AC and lighting
- RoboMaster: Precise robot position synchronization (DJI’s official solution)
- Digital keys: UWB car keys (already used by BMW/iPhone)
8. Cost Breakdown
| Item | Unit Price | Quantity | Subtotal |
|---|---|---|---|
| ESP32-S3 dev board | ¥25 | 4 | ¥100 |
| DWM3000 module | ¥90 | 4 | ¥360 |
| Power cables / jumper wires | - | Various | ¥20 |
| 3D printed enclosures | - | 3 sets | ¥15 |
| Total | ¥495 |
A 4-node centimeter-level positioning system for under 500 RMB — excellent value.
Summary
UWB is currently the most accurate positioning technology available at the consumer level, and the DW3000 has brought the barrier down to what individual DIYers can reach. Key takeaways:
- Choose DS-TWR for ranging: High accuracy, resistant to clock drift
- Antenna delay calibration is mandatory: This is the #1 accuracy pitfall
- Triangle layout for anchors: Don’t make them collinear!
- Kalman filter for smoothing: Raw data jitter is normal
- Stable power supply: Excessive 3.3V ripple causes ranging drift
Next steps could include pushing positioning data to an MQTT broker and building a real-time trajectory dashboard in Grafana, or integrating with Home Assistant for presence detection.
Give it a try — centimeter-level positioning isn’t as out of reach as you might think!