 IoT
IoT Bluetooth Mesh Networking Guide: Smart Home Multi-Device Linkage
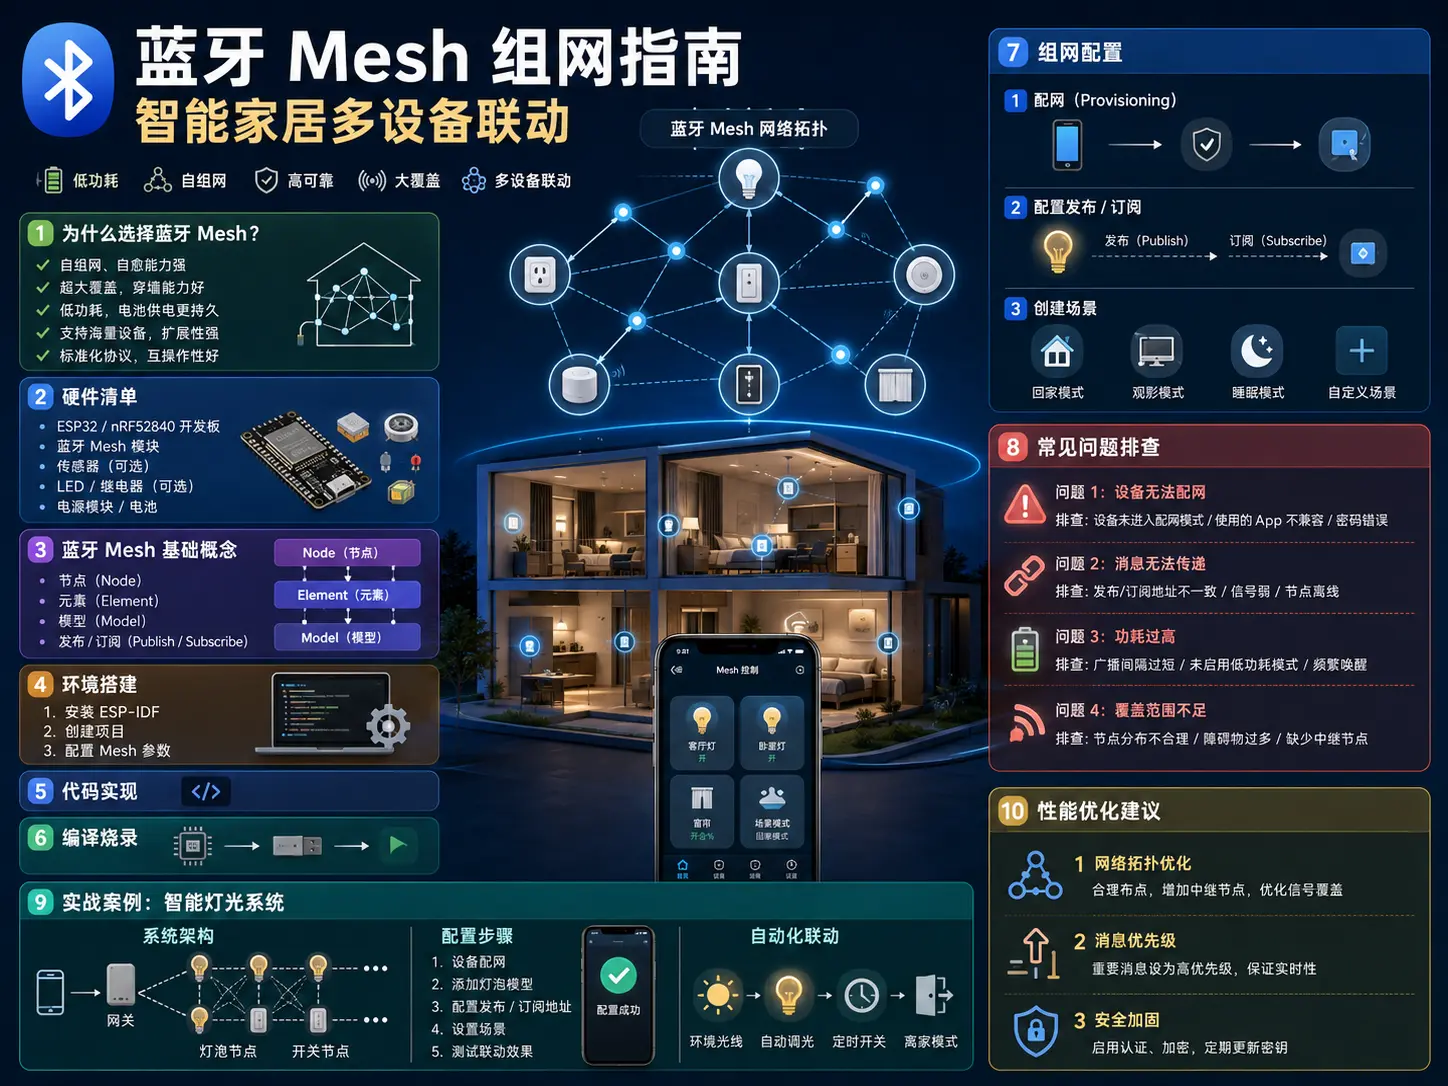
Why Choose Bluetooth Mesh?
When it comes to smart home networking, many people’s first thought is WiFi or Zigbee. But Bluetooth Mesh is actually an underrated contender.
It has several clear advantages:
-
Wide coverage: Through node relaying, signals can pass through walls and floors, easily covering 100+ square meters
-
Low power consumption: Device standby power is extremely low, battery-powered sensors can last months or even a year
-
Low cost: Bluetooth chip prices are affordable, ESP32 development boards can be had for just tens of yuan
-
Direct phone connection: No extra gateway needed, phones can directly control devices
If you’re building a smart home system and don’t want to spend big money on a complete solution, Bluetooth Mesh is a very practical choice.
Hardware List
| Device | Model | Quantity | Unit Price | Total |
|---|---|---|---|---|
| ESP32 development board | ESP32-WROOM-32 | 3 pieces | ¥25 | ¥75 |
| Bluetooth Mesh module | JDY-64 | 2 pieces | ¥18 | ¥36 |
| Temperature/humidity sensor | SHT30 | 1 piece | ¥15 | ¥15 |
| Relay module | 5V single channel | 2 pieces | ¥8 | ¥16 |
| USB data cable | Micro-USB | 3 pieces | ¥5 | ¥15 |
| Breadboard | 830 holes | 1 piece | ¥12 | ¥12 |
| Jumper wires | Male-to-male/Female-to-female | 20 pieces | ¥8 | ¥8 |
| Total | - | - | - | ¥177 |
All accessories can be purchased on Taobao or LCSC, total price under 200 yuan to build a complete Bluetooth Mesh network.
Bluetooth Mesh Basic Concepts
Before getting hands-on, let’s understand a few core concepts:
Node
Every device that joins the Mesh network is a node. Nodes can:
-
Send messages (like temperature/humidity sensor reporting data)
-
Receive messages (like relay receiving on/off commands)
-
Relay messages (help other nodes forward signals)
Element
A node can contain multiple elements. For example, a smart switch panel might have 3 buttons, each button is an independent element.
Model
Models define device functionality. Common ones include:
-
Generic OnOff: Switch control
-
Sensor: Sensor data reporting
-
Light Lightness: Light brightness adjustment
Publish/Subscribe
This is the core mechanism of Mesh networks:
-
Publish address: Which address the device sends messages to
-
Subscribe address: Which address the device listens to for messages
For example: Temperature/humidity sensor publishes to address 0xC001, relay subscribes to 0xC001, so sensor data can automatically trigger relay actions.
Environment Setup
1. Install ESP-IDF
ESP32’s official development framework is ESP-IDF. We’ll use Docker installation to avoid polluting the system environment:
# Pull ESP-IDF Docker image
docker pull espressif/idf

# Create working directory
mkdir -p ~/esp-mesh-project
cd ~/esp-mesh-project

# Start container
docker run --rm -v $PWD:/project -w /project -it espressif/idf bash
2. Create Project
# Execute inside container
idf.py create-project bluetooth-mesh-node
cd bluetooth-mesh-node
3. Configure Mesh Parameters
Edit sdkconfig, enable Bluetooth Mesh support:
idf.py menuconfigNavigate to:
Component config → Bluetooth → Bluedroid Enable → Enable Bluetooth MeshAfter saving and exiting, execute:
idf.py fullcleanCode Implementation
Node Main Program
Create main/main.c:
#include <stdio.h>
#include "esp_log.h"
#include "nvs_flash.h"
#include "esp_bt.h"
#include "esp_ble_mesh_api.h"

static const char *TAG = "MESH_NODE";

// Device UUID (each device needs to be unique)
static uint8_t dev_uuid[16] = {
    0xdd, 0xdd, 0xdd, 0xdd, 0xdd, 0xdd, 0xdd, 0xdd,
    0xdd, 0xdd, 0xdd, 0xdd, 0xdd, 0xdd, 0xdd, 0xdd
};

// Mesh configuration
static esp_ble_mesh_cfg_srv_t config_server = {
    .relay = ESP_BLE_MESH_RELAY_DISABLED,
    .beacon = ESP_BLE_MESH_BEACON_ENABLED,
};

static esp_ble_mesh_model_t models[] = {
    ESP_BLE_MESH_MODEL_CFG_SRV(&config_server),
    ESP_BLE_MESH_MODEL_NONE(),
};

static esp_ble_mesh_elem_t elements[] = {
    ESP_BLE_MESH_ELEMENT(0, models, models, models),
};

static esp_ble_mesh_comp_t composition = {
    .cid = 0x02E5,
    .elements = elements,
    .element_count = ARRAY_SIZE(elements),
};

static esp_ble_mesh_prov_t provision = {
    .uuid = dev_uuid,
    .uuid_size = sizeof(dev_uuid),
    .attention_duration = 3,
};

// Mesh event callback
static void mesh_callback(esp_ble_mesh_event_t *event) {
    switch (event->event) {
        case ESP_BLE_MESH_PROVISION_NODE_EVT:
            ESP_LOGI(TAG, "Node provisioned successfully");
            break;
        case ESP_BLE_MESH_NODE_EVT:
            ESP_LOGI(TAG, "Node received message");
            break;
        default:
            break;
    }
}

void app_main(void) {
    esp_err_t ret;

    // Initialize NVS
    ret = nvs_flash_init();
    if (ret == ESP_ERR_NVS_NO_FREE_PAGES) {
        ESP_ERROR_CHECK(nvs_flash_erase());
        ret = nvs_flash_init();
    }
    ESP_ERROR_CHECK(ret);

    // Initialize Bluetooth
    ESP_ERROR_CHECK(esp_bt_controller_mem_release(ESP_BT_MODE_CLASSIC_BT));

    esp_bt_controller_config_t bt_cfg = BT_CONTROLLER_INIT_CONFIG_DEFAULT();
    ESP_ERROR_CHECK(esp_bt_controller_init(&bt_cfg));
    ESP_ERROR_CHECK(esp_bt_controller_enable(ESP_BT_MODE_BLE));

    // Initialize Bluedroid
    ESP_ERROR_CHECK(esp_bluedroid_init());
    ESP_ERROR_CHECK(esp_bluedroid_enable());

    // Initialize Mesh
    esp_ble_mesh_init(mesh_callback);

    // Start provisioning
    ESP_ERROR_CHECK(esp_ble_mesh_provisioner_add_unprov_dev(
        dev_uuid, sizeof(dev_uuid),
        0, 0, NULL, 0
    ));

    ESP_LOGI(TAG, "Bluetooth Mesh node startup complete");
}
Compile and Flash
# Compile project
idf.py build

# Flash to ESP32 (replace /dev/ttyUSB0 with your device port)
idf.py -p /dev/ttyUSB0 flash monitor
Network Configuration
1. Provisioning
Use mobile App (like nRF Mesh) for provisioning:
-
Open nRF Mesh App, scan for unprovisioned devices: App will automatically discover nearby Bluetooth Mesh devices in unprovisioned state.
-
Click target device, select “Identify”: App sends Identify action, device LED will blink to confirm identity.
-
Enter network key: If provisioning for the first time, App will auto-generate network key; if joining existing network, enter pre-configured key.
-
Assign unicast address: App automatically assigns unique unicast address to device (like 0x0001, 0x0002), provisioning complete, device officially online.
2. Configure Publish/Subscribe
Configure in App:
Device: Living Room Light
├─ Subscribe address: 0xC001 (group address)
└─ Publish address: 0x0001 (own unicast address)

Device: Bedroom Sensor
├─ Subscribe address: 0x0002 (own unicast address)
└─ Publish address: 0xC001 (group address)
This way, sensor data published to 0xC001 can be received by all devices subscribed to that address.
3. Create Scenes
Scenes are a set of predefined actions:
Scene name: Away mode
Trigger condition: Press scene switch
Execute actions:
  - Turn off living room light (address 0x0001)
  - Turn off bedroom light (address 0x0002)
  - Enable security mode (address 0x0003)
Common Problem Troubleshooting
Problem 1: Device Cannot Be Provisioned
Symptom: Mobile App cannot scan device
Troubleshooting steps:
-
Check if device is powered on and in unprovisioned state: Only new devices or devices with erased NVS can be scanned. If device is already provisioned, need to execute Reset Node first to clear provisioning info.
-
Confirm Bluetooth is enabled and phone is near device: During provisioning, phone needs to be within device Bluetooth range (usually within 10 meters). Stay away from interference sources (like WiFi routers, microwaves).
-
Check if device firmware was flashed correctly: Confirm ESP32 is running correct Mesh node firmware, serial log should have “unprovisioned device broadcasting” output.
-
Try restarting device and phone App: Sometimes Bluetooth stack gets stuck, restart both and try again. If still not working, use
idf.py erase-flashto erase ESP32 then reflash.
Problem 2: Messages Cannot Be Delivered
Symptom: Device is provisioned, but control commands have no response
Troubleshooting steps:
-
Check if publish/subscribe addresses match: Sender’s publish address and receiver’s subscribe address must be consistent. Use nRF Mesh App to view device Model configuration, confirm address settings are correct.
-
Confirm TTL value is large enough: TTL (Time To Live) determines how many times message can be relayed. If devices are far apart or there are obstacles in between, TTL needs to be set to 3-5 to reach.
-
Check network key (NetKey) and application key (AppKey): All devices participating in communication must use the same keys. Key mismatch will cause messages to be discarded.
-
View serial log to confirm if message arrived: In receiving ESP32’s serial output, check if there are logs of received messages. If not received, message never reached that node.
Problem 3: Power Consumption Too High
Symptom: Battery-powered device has short battery life
Optimization solutions:
-
Enable LPN (Low Power Node) mode: Battery-powered devices configured as LPN, mostly in deep sleep, only wake up at fixed intervals to receive messages. Power consumption can drop from mA level to μA level.
-
Reduce message sending frequency: Sensor data doesn’t need real-time reporting, sending once every 10 seconds or 30 seconds is sufficient. Use
esp_deep_sleepto sleep during sending intervals. -
Turn off unnecessary features: Turn off log output (change
ESP_LOGItoESP_LOG_NONE), disable classic Bluetooth, reduce CPU frequency to 80MHz, all can significantly reduce power consumption. -
Use Friend Key: LPN nodes cache messages through friend nodes, only wake up at fixed time windows to fetch messages, greatly reducing radio on time.
// Enter deep sleep (wake up after 10 seconds)
esp_deep_sleep(10 * 1000000ULL);
Problem 4: Coverage Range Insufficient
Symptom: Long-distance device communication unstable
Solutions:
-
Add relay nodes: Deploy relay nodes in weak signal areas to help forward messages. ESP32 development boards are cheap, adding a few more nodes costs very little.
-
Increase transmit power: In
sdkconfig, increase Bluetooth transmit power from 0dBm to 9dBm (ESP32 maximum), coverage range can increase 2-3 times. -
Optimize antenna position and direction: Ensure ESP32 onboard antenna is not blocked by metal, antenna direction perpendicular to ground. If necessary, connect external SMA antenna to enhance signal.
-
Adjust network topology: Place critical devices (like gateway, scene switches) in central positions, deploy other devices around them, reducing message hops. Avoid devices arranged in straight lines causing weak signal at ends.
Let’s build a complete smart lighting system:
System Architecture
graph TD
    Switch["Scene Switch<br/>(0x0001)"]
    Gateway["Gateway Node<br/>(0x0002)"]
    Phone["Mobile App"]
    Light1["Living Room Light<br/>(0x0003)"]
    Light2["Bedroom Light<br/>(0x0004)"]
    Light3["Kitchen Light<br/>(0x0005)"]

    Switch -->|Publish commands| Gateway
    Phone -->|Publish commands| Gateway
    Gateway -->|Group 0xC001| Light1
    Gateway -->|Group 0xC001| Light2
    Gateway -->|Group 0xC001| Light3
Configuration Steps
-
Provision each light node and assign addresses: Use nRF Mesh App to provision living room light (0x0003), bedroom light (0x0004), kitchen light (0x0005) in sequence, configure Generic OnOff Server Model for each node.
-
Create group addresses and set subscriptions: Create group address 0xC001 (whole house lights), have all light nodes subscribe to this address. Then create 0xC002 (living room), 0xC003 (bedroom) and other zone groups for zone control.
-
Configure scene switch’s publish address: Scene switch subscribes to scene trigger address, publishes to corresponding group address. When pressing “Away mode” button, switch publishes to 0xC001, all lights receive off command.
Add sensors to implement automation:
If light sensor < 100lux and human sensor = detected
Then turn on corresponding zone lights (auto-off after 30 second delay)
Performance Optimization Suggestions
1. Network Topology Optimization
-
Star topology: Suitable for small areas (<50 square meters)
-
Mesh topology: Suitable for large areas, enable relaying
-
Hybrid topology: Critical paths use mesh, edges use star
2. Message Priority
// High priority messages (send immediately)
esp_ble_mesh_generic_server_publish(..., TTL_HIGH);

// Low priority messages (can be delayed)
esp_ble_mesh_generic_server_publish(..., TTL_LOW);
3. Security Hardening
-
Enable application key encryption
-
Regularly update network keys
-
Limit provisioning time window
-
Use OOB authentication (like QR codes)
Summary
Bluetooth Mesh is a practical choice for building smart homes. It’s low cost, wide coverage, low power, and doesn’t require extra gateways.
Key points:
-
Understanding publish/subscribe mechanism is the core of networking
-
Reasonably plan network topology and address allocation
-
Enable LPN mode for low power scenarios
-
Add relay nodes in weak signal areas
With 200 yuan hardware investment, you can build a smart control system covering the whole house. The rest is just using your creativity to turn your ideas into reality.
Hope this blog post is helpful to you!