教你用1000元预算打造家门口的人脸识别监控系统:
我们只需Jetson Nano配上一个简单的摄像头就能实现识别和记录来访你家门口的人员。
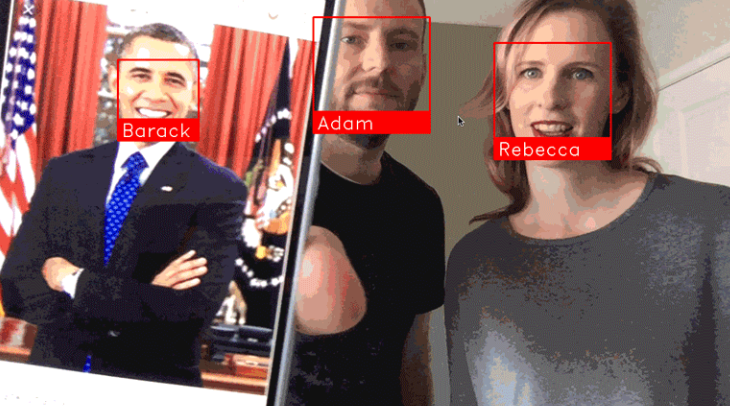
通过人脸识别模块face_recognition,能够实时监控到来访人员是否曾经来过,并且记录具体什么时候和多少次来访。即使他们每次来访是穿不同的衣服,系统也是能够识别出来的。
英伟达的Jetson Nano板子十分强大,使你能够以非常小的预算就能实现GPU加速的深度学习模型。Jetson Nano与树莓派相似,但前者计算速度快很多。

(通过人脸识别模块face_recognition和Python,你可以轻松地打造自己的家门监控系统,识别和记录来访人员)
需要准备什么?
- 英伟达Jetson Nano开发板(¥800)
- MicroUSB电源线(¥10)
- 树莓派摄像头v2.x版本(¥150)
- TF储存卡(至少32G)(¥40)
- 其他你可能已经有的设备:TF卡读取器,USB连接的键盘和鼠标,HDMI接口的显示器,网线
安装Jetson Nano镜像
如何烧Jetson Nano系统的镜像,我就不在这重复了,刚入手的同学们自行搜索一下其他教程。
正确连接摄像头

要确保摄像头正确连接到Jetson Nano的板子上喔!
有些同学很容易将此反向接入了,或者镜头的位置。
首次账户登陆的设置
第一次登陆Jetson Nano系统,你需要走一遍标准的Ubuntu Linux系统初始用户的设置,设置好账户和密码(我们随后口令行当中是需要用到的)。
在此初始步骤,系统已经预先安装好了Python3.6和OpenCV,是可以立即通过终端Terminal来运行Python程序的。但为了正常运行家门视频监控模块,我们依然是需要给系统安装一些库的。
安装所需的Python库
为了让人脸识别模块运行,我们需要先安装一些Python库。虽然Jetson Nano本身就预装好不少有用的库,但还是会遇到一些奇奇怪怪的疏漏。比如,OpenCV本来就安装好了,但是为了正常使用之前,需要安装pip和numpy这些库。那就让我们来先解决一下这问题。
首先在Jetson Nano桌面以下快捷键打开终端:
Ctrl + Alt + T
在终端窗口输入以下命令:(如果需输入密码,就是初始创建账号的用户密码)
sudo apt-get update
sudo apt-get install python3-pip cmake libopenblas-dev liblapack-dev libjpeg-dev首先,我们先更新apt,这是Linux的安装工具。
然后,通过apt安装一些基本库,这都是为了之后支持numpy和dlib的运行。
我们进行下一步之前,我们需要创建一个swapfile。Jetson Nano开发板的RAM只有4GB,这在运行dlib当中是不够用的,所以我们需要通过swapfile让TF卡空间都能成为更多的RAM来协助运行。幸运的是,我们只需要两行代码就可以实现!
git clone https://github.com/JetsonHacksNano/installSwapfile
./installSwapfile/installSwapfile.sh
备注:这高效的方法得感谢前辈JetsonHacks,实在太好用了!
到这一步,我们需要重新启动系统,确保swapfile能够正常运作。如果你跳过这一步的话,很可能下一步骤会遇到错误。你可以自行在桌面的主菜单来重启,或输入口令
sudo reboot重启登陆好之后,在终端Terminal窗口继续下一步:安装numpy,这是用于矩阵计算的Python库
pip3 install numpy这安装过程大概会花费15分钟时间。如果安装过程定住了,不用担心,耐心等待一下。
好了,现在装备好安装dlib了,这是大师Davis King创建的深度学习库,这使得人脸识别face_recognition库的运行效率大大提高。
但是……目前Jetson Nano有个小小的bug无法很好地使得dlib运行。英伟达社区的大神们已经确定了这个bug只需要编辑修改一行代码就可以了,所以不用担心,不是什么大问题。
在终端,我们先运行下载dlib,然后解压代码。
wget http://dlib.net/files/dlib-19.17.tar.bz2
tar jxvf dlib-19.17.tar.bz2
cd dlib-19.17
在我们运行之前,我们先编辑修改其中一条代码:
gedit dlib/cuda/cudnn_dlibapi.cpp这时会跳出一个文本编辑器来修改程序。上面的gedit也可以修改为vi,vim或nano口令来执行,不了解这三个文本编辑口令的同学,自行搜索学习。
搜索程序文本的第854行:
forward_algo = forward_best_algo;在其前面加//使得,将此代码注释化(忽略运行):
//forward_algo = forward_best_algo;然后保存此文本,回到终端命令行,安装dlib:
sudo python3 setup.py install这过程大概需要30~60分钟,这过程Jetson Nano可能会发热,但没问题的,让它发热吧,别发光就好,哈哈。
以上完成之后,我们就开始安装人脸识别python库face_recognition啦:
sudo pip3 install face_recognition现在你的Jetson Nano已经准备好通过Cuda的GPU加速器来执行人脸识别了,下一步就是新建家们视频监控(Doorcam)的python代码了。
创建家门视频监控代码 DoorCam
首先,我们创建一个专门的程序文件夹吧,然后通过vi来新建python程序(或者口令gedit,vim,nano):
cd
mkdir doorcam
vi doorcam.py这时我们会进入vi文本界面了,打开此链接DoorCam By ageitgey或者到本文结尾代码行,将所有python代码复制粘贴过去vi界面,并且保存。
(提示一下不熟悉vi操作的同学:复制粘贴代码之后,按esc,输入:wq!并且回车)
这时候我们就完全准备好运行家门视频监控啦!
是不是很激动?!?!😊
来,我们开始开启运行python的魔法吧:
python3 doorcam.py这时你会发现桌面跳出一个新的窗口,如无意外,视频启动,你本人就能上镜了!
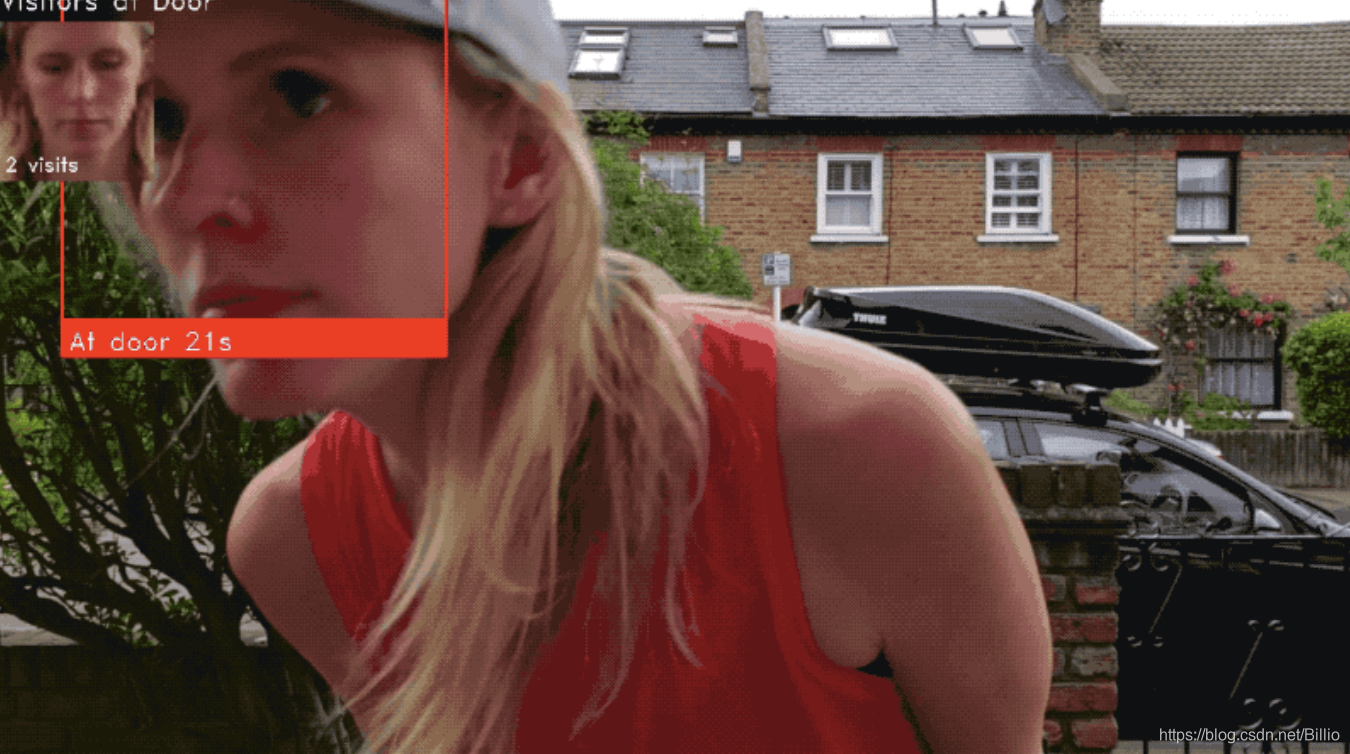
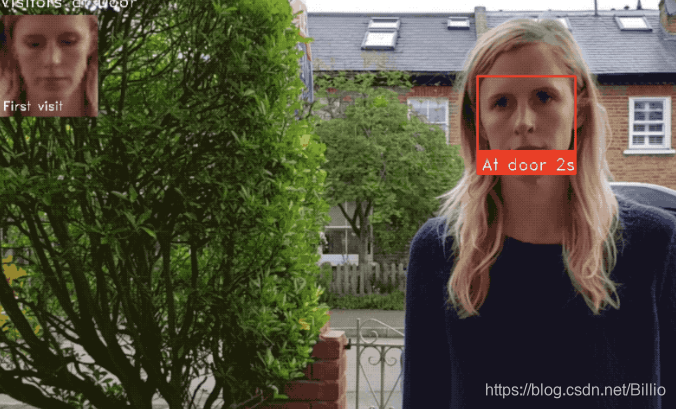
就如下漂亮姐姐一样的效果

每当有新的人脸出现在镜头前,程序就会注册这个脸,右上角显示First Visit(首次访问)并追踪该人在镜头前停留多长时间,随后还能记录该人在镜头前出现多少次。人物离开5分钟后,再次出现镜头前,定义为新的访问。
你可以任何时刻输入Q退出。
该程序会自动保存每一位出现在镜头的人物,数据保存在文件名为known_faces.dat的地方。
每次你重新运行该程序,它都会参考此数据来识别是否已有的访客。
如果你要清除已记录的人脸,那么只需删除此文档就行了。
带你理解此程序
要不要理解此代码原理是怎么的?(待完成)
主编我另外再找时间完善吧……
你要是等不及的话,自行搜索大神Adam Geitgey的GitHub阅读英文解释。
备注
以上教程内容原创于大神Adam Geitgey,根据他的博客教程翻译编辑,大家可以去他的GitHub进一步学习喔!
DoorCam代码
import face_recognition
import cv2
from datetime import datetime, timedelta
import numpy as np
import platform
import pickle

# Our list of known face encodings and a matching list of metadata about each face.
known_face_encodings = []
known_face_metadata = []

def save_known_faces():
    with open("known_faces.dat", "wb") as face_data_file:
        face_data = [known_face_encodings, known_face_metadata]
        pickle.dump(face_data, face_data_file)
        print("Known faces backed up to disk.")

def load_known_faces():
    global known_face_encodings, known_face_metadata

    try:
        with open("known_faces.dat", "rb") as face_data_file:
            known_face_encodings, known_face_metadata = pickle.load(face_data_file)
            print("Known faces loaded from disk.")
    except FileNotFoundError as e:
        print("No previous face data found - starting with a blank known face list.")
        pass

def running_on_jetson_nano():
    # To make the same code work on a laptop or on a Jetson Nano, we'll detect when we are running on the Nano
    # so that we can access the camera correctly in that case.
    # On a normal Intel laptop, platform.machine() will be "x86_64" instead of "aarch64"
    return platform.machine() == "aarch64"

def get_jetson_gstreamer_source(capture_width=1280, capture_height=720, display_width=1280, display_height=720, framerate=60, flip_method=0):
    """
    Return an OpenCV-compatible video source description that uses gstreamer to capture video from the camera on a Jetson Nano
    """
    return (
            f'nvarguscamerasrc ! video/x-raw(memory:NVMM), ' +
            f'width=(int){capture_width}, height=(int){capture_height}, ' +
            f'format=(string)NV12, framerate=(fraction){framerate}/1 ! ' +
            f'nvvidconv flip-method={flip_method} ! ' +
            f'video/x-raw, width=(int){display_width}, height=(int){display_height}, format=(string)BGRx ! ' +
            'videoconvert ! video/x-raw, format=(string)BGR ! appsink'
            )

def register_new_face(face_encoding, face_image):
    """
    Add a new person to our list of known faces
    """
    # Add the face encoding to the list of known faces
    known_face_encodings.append(face_encoding)
    # Add a matching dictionary entry to our metadata list.
    # We can use this to keep track of how many times a person has visited, when we last saw them, etc.
    known_face_metadata.append({
        "first_seen": datetime.now(),
        "first_seen_this_interaction": datetime.now(),
        "last_seen": datetime.now(),
        "seen_count": 1,
        "seen_frames": 1,
        "face_image": face_image,
    })

def lookup_known_face(face_encoding):
    """
    See if this is a face we already have in our face list
    """
    metadata = None

    # If our known face list is empty, just return nothing since we can't possibly have seen this face.
    if len(known_face_encodings) == 0:
        return metadata

    # Calculate the face distance between the unknown face and every face on in our known face list
    # This will return a floating point number between 0.0 and 1.0 for each known face. The smaller the number,
    # the more similar that face was to the unknown face.
    face_distances = face_recognition.face_distance(known_face_encodings, face_encoding)

    # Get the known face that had the lowest distance (i.e. most similar) from the unknown face.
    best_match_index = np.argmin(face_distances)

    # If the face with the lowest distance had a distance under 0.6, we consider it a face match.
    # 0.6 comes from how the face recognition model was trained. It was trained to make sure pictures
    # of the same person always were less than 0.6 away from each other.
    # Here, we are loosening the threshold a little bit to 0.65 because it is unlikely that two very similar
    # people will come up to the door at the same time.
    if face_distances[best_match_index] < 0.65:
        # If we have a match, look up the metadata we've saved for it (like the first time we saw it, etc)
        metadata = known_face_metadata[best_match_index]

        # Update the metadata for the face so we can keep track of how recently we have seen this face.
        metadata["last_seen"] = datetime.now()
        metadata["seen_frames"] += 1

        # We'll also keep a total "seen count" that tracks how many times this person has come to the door.
        # But we can say that if we have seen this person within the last 5 minutes, it is still the same
        # visit, not a new visit. But if they go away for awhile and come back, that is a new visit.
        if datetime.now() - metadata["first_seen_this_interaction"] > timedelta(minutes=5):
            metadata["first_seen_this_interaction"] = datetime.now()
            metadata["seen_count"] += 1

    return metadata

def main_loop():
    # Get access to the webcam. The method is different depending on if this is running on a laptop or a Jetson Nano.
    if running_on_jetson_nano():
        # Accessing the camera with OpenCV on a Jetson Nano requires gstreamer with a custom gstreamer source string
        video_capture = cv2.VideoCapture(get_jetson_gstreamer_source(), cv2.CAP_GSTREAMER)
    else:
        # Accessing the camera with OpenCV on a laptop just requires passing in the number of the webcam (usually 0)
        # Note: You can pass in a filename instead if you want to process a video file instead of a live camera stream
        video_capture = cv2.VideoCapture(0)

    # Track how long since we last saved a copy of our known faces to disk as a backup.
    number_of_faces_since_save = 0

    while True:
        # Grab a single frame of video
        ret, frame = video_capture.read()

        # Resize frame of video to 1/4 size for faster face recognition processing
        small_frame = cv2.resize(frame, (0, 0), fx=0.25, fy=0.25)

        # Convert the image from BGR color (which OpenCV uses) to RGB color (which face_recognition uses)
        rgb_small_frame = small_frame[:, :, ::-1]

        # Find all the face locations and face encodings in the current frame of video
        face_locations = face_recognition.face_locations(rgb_small_frame)
        face_encodings = face_recognition.face_encodings(rgb_small_frame, face_locations)

        # Loop through each detected face and see if it is one we have seen before
        # If so, we'll give it a label that we'll draw on top of the video.
        face_labels = []
        for face_location, face_encoding in zip(face_locations, face_encodings):
            # See if this face is in our list of known faces.
            metadata = lookup_known_face(face_encoding)

            # If we found the face, label the face with some useful information.
            if metadata is not None:
                time_at_door = datetime.now() - metadata['first_seen_this_interaction']
                face_label = f"At door {int(time_at_door.total_seconds())}s"

            # If this is a brand new face, add it to our list of known faces
            else:
                face_label = "New visitor!"

                # Grab the image of the the face from the current frame of video
                top, right, bottom, left = face_location
                face_image = small_frame[top:bottom, left:right]
                face_image = cv2.resize(face_image, (150, 150))

                # Add the new face to our known face data
                register_new_face(face_encoding, face_image)

            face_labels.append(face_label)

        # Draw a box around each face and label each face
        for (top, right, bottom, left), face_label in zip(face_locations, face_labels):
            # Scale back up face locations since the frame we detected in was scaled to 1/4 size
            top *= 4
            right *= 4
            bottom *= 4
            left *= 4

            # Draw a box around the face
            cv2.rectangle(frame, (left, top), (right, bottom), (0, 0, 255), 2)

            # Draw a label with a name below the face
            cv2.rectangle(frame, (left, bottom - 35), (right, bottom), (0, 0, 255), cv2.FILLED)
            cv2.putText(frame, face_label, (left + 6, bottom - 6), cv2.FONT_HERSHEY_DUPLEX, 0.8, (255, 255, 255), 1)

        # Display recent visitor images
        number_of_recent_visitors = 0
        for metadata in known_face_metadata:
            # If we have seen this person in the last minute, draw their image
            if datetime.now() - metadata["last_seen"] < timedelta(seconds=10) and metadata["seen_frames"] > 5:
                # Draw the known face image
                x_position = number_of_recent_visitors * 150
                frame[30:180, x_position:x_position + 150] = metadata["face_image"]
                number_of_recent_visitors += 1

                # Label the image with how many times they have visited
                visits = metadata['seen_count']
                visit_label = f"{visits} visits"
                if visits == 1:
                    visit_label = "First visit"
                cv2.putText(frame, visit_label, (x_position + 10, 170), cv2.FONT_HERSHEY_DUPLEX, 0.6, (255, 255, 255), 1)

        if number_of_recent_visitors > 0:
            cv2.putText(frame, "Visitors at Door", (5, 18), cv2.FONT_HERSHEY_DUPLEX, 0.8, (255, 255, 255), 1)

        # Display the final frame of video with boxes drawn around each detected fames
        cv2.imshow('Video', frame)

        # Hit 'q' on the keyboard to quit!
        if cv2.waitKey(1) & 0xFF == ord('q'):
            save_known_faces()
            break

        # We need to save our known faces back to disk every so often in case something crashes.
        if len(face_locations) > 0 and number_of_faces_since_save > 100:
            save_known_faces()
            number_of_faces_since_save = 0
        else:
            number_of_faces_since_save += 1

    # Release handle to the webcam
    video_capture.release()
    cv2.destroyAllWindows()

if __name__ == "__main__":
    load_known_faces()
    main_loop()


