 Embedded Development
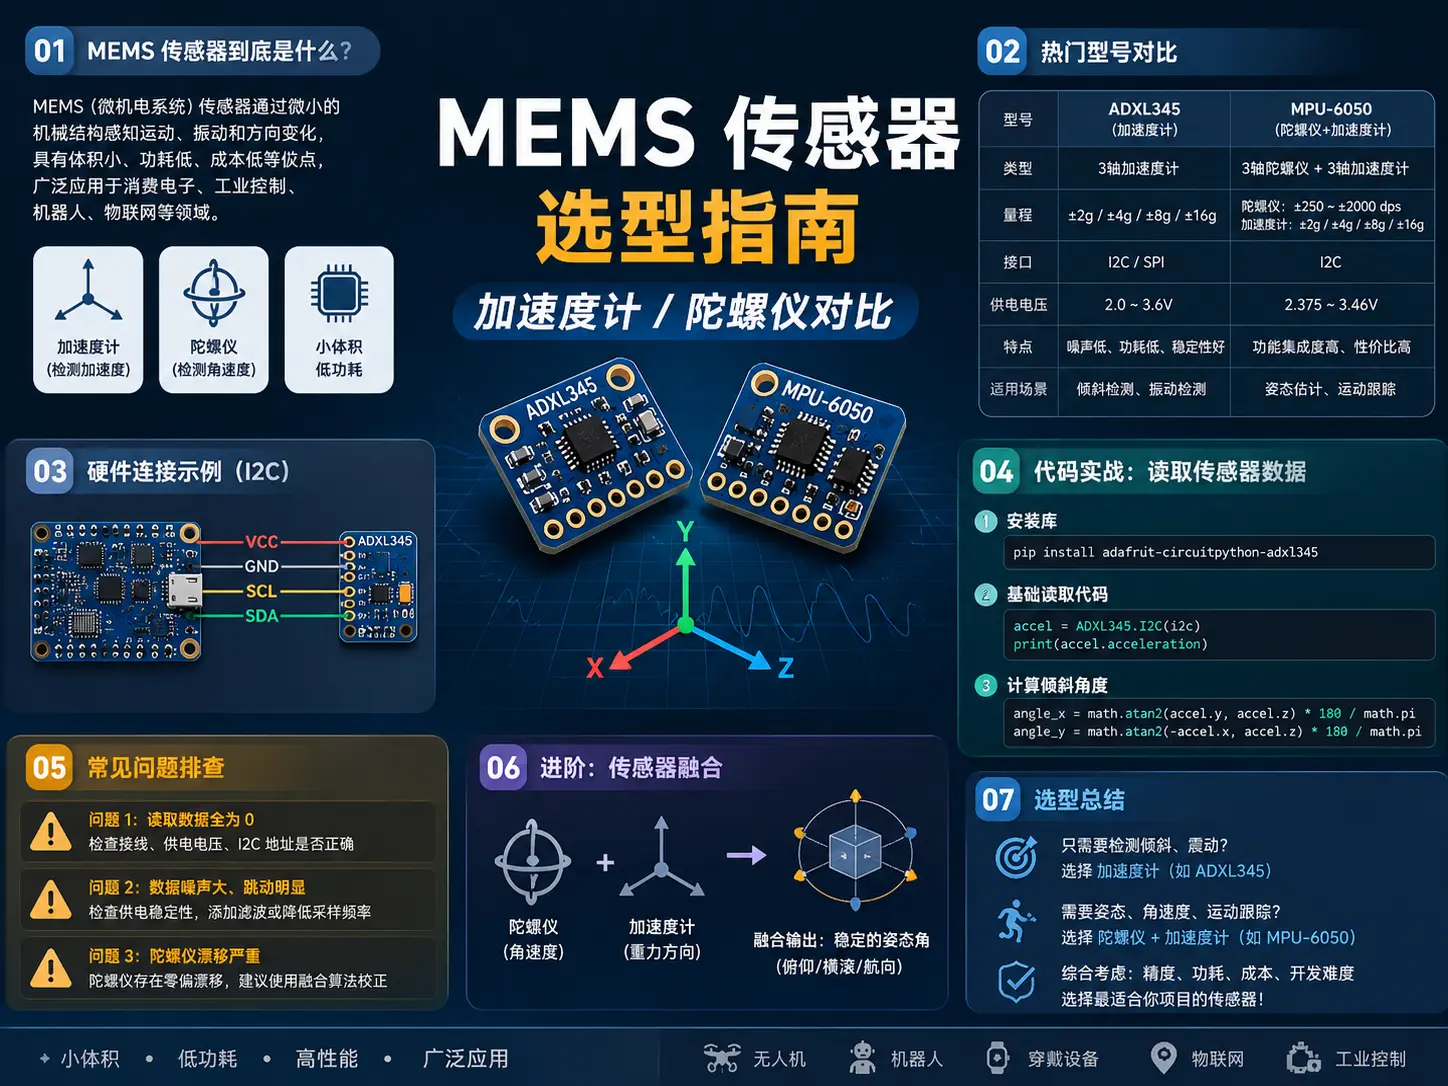
 MEMS Sensor Selection Guide: Accelerometer/Gyroscope Comparison
When doing embedded development, sensor selection is an unavoidable hurdle. Especially for MEMS sensors - accelerometers, gyroscopes, IMUs - there are so many models, prices ranging from a few yuan to hundreds, making it easy for beginners to fall into pitfalls.
Today we’ll discuss how to choose MEMS sensors, and compare several popular models to help you avoid detours.
What Exactly Are MEMS Sensors?
MEMS (Micro-Electro-Mechanical Systems) are miniature electromechanical systems. Simply put, they integrate mechanical structures (like cantilever beams, proof masses) and circuits on a single chip.
There are three common types of MEMS sensors:
-
Accelerometer: Measures linear acceleration, can sense tilt, vibration, shock
-
Gyroscope: Measures angular velocity, can sense rotation, turning
-
IMU (Inertial Measurement Unit): Combination of accelerometer + gyroscope, some also include magnetometer
First step in selection: Understand what you need to measure.
-
Want to make a pedometer, tilt detection? → Accelerometer is enough
-
Want gesture recognition, attitude control? → Need gyroscope
-
Want to make drones, balance cars, VR devices? → Go directly for IMU
Popular Model Comparison
There are quite a few common MEMS sensor models on the market. I’ve picked 5 commonly used ones to compare:
| Model | Type | Accelerometer Range | Gyroscope Range | Interface | Price | Application Scenario |
|---|---|---|---|---|---|---|
| MPU6050 | IMU | ±2/4/8/16g | ±250/500/1000/2000°/s | I2C | ¥8-15 | Best for beginners, balance cars, drones |
| ICM20948 | IMU | ±2/4/8/16g | ±250/500/1000/2000°/s | I2C/SPI | ¥25-40 | High precision, VR/AR, gesture recognition |
| BMI088 | IMU | ±3/6/12/24g | ±125/250/500/1000/2000°/s | I2C/SPI | ¥30-50 | Industrial grade, robots, vibration analysis |
| ADXL345 | Accelerometer | ±2/4/8/16g | None | I2C/SPI | ¥10-20 | Pure acceleration measurement, tilt detection |
| L3GD20H | Gyroscope | None | ±245/500/2000°/s | I2C/SPI | ¥12-25 | Pure angular velocity measurement, turning detection |
Selection Recommendations:
-
Beginner learning: MPU6050, cheap, lots of documentation, rich libraries
-
High precision needs: ICM20948, low noise, small temperature drift
-
Industrial applications: BMI088, shock resistant, wide temperature range
-
Cost sensitive: ADXL345 or L3GD20H, single function is sufficient
Hardware Connection Example
Taking MPU6050 as an example, wiring is very simple:
| MPU6050 | ESP32 | Description |
|---|---|---|
| VCC | 3.3V | Power (some modules support 5V) |
| GND | GND | Ground |
| SCL | GPIO21 | I2C clock |
| SDA | GPIO22 | I2C data |
| INT | GPIO15 | Interrupt (optional) |
| ADO | GND | I2C address selection (0x68 or 0x69) |
Note: MPU6050 is a 3.3V device. If using a 5V microcontroller (like Arduino Uno), you need level shifting.
Code Practice: Reading Sensor Data
Below we use ESP32 + MPU6050 to demonstrate how to read acceleration and gyroscope data.
1. Install Library
# PlatformIO
pio lib install "MPU6050 by Electronic Cats"

# Arduino IDE
# Search "MPU6050" in library manager and install
2. Basic Reading Code
#include <Wire.h>
#include <Adafruit_MPU6050.h>
#include <Adafruit_Sensor.h>

MPU6050 mpu;

void setup() {
  Serial.begin(115200);
  Wire.begin();

  // Initialize MPU6050
  if (!mpu.begin()) {
    Serial.println("MPU6050 initialization failed, check wiring!");
    while (1);
  }

  // Configure range
  mpu.setAccelerometerRange(MPU6050_RANGE_8_G);
  mpu.setGyroRange(MPU6050_RANGE_500_DEG);
  mpu.setFilterBandwidth(MPU6050_BAND_21_HZ);

  Serial.println("MPU6050 initialized successfully!");
}

void loop() {
  sensors_event_t a, g, temp;
  mpu.getEvent(&a, &g, &temp);

  // Print acceleration (unit: m/s²)
  Serial.print("Accel X: "); Serial.print(a.acceleration.x);
  Serial.print(" Y: "); Serial.print(a.acceleration.y);
  Serial.print(" Z: "); Serial.println(a.acceleration.z);

  // Print angular velocity (unit: rad/s)
  Serial.print("Gyro X: "); Serial.print(g.gyro.x);
  Serial.print(" Y: "); Serial.print(g.gyro.y);
  Serial.print(" Z: "); Serial.println(g.gyro.z);

  delay(100);
}
3. Calculate Tilt Angle
Accelerometer can calculate static tilt angle:
float getPitch() {
  sensors_event_t a, g, temp;
  mpu.getEvent(&a, &g, &temp);

  // pitch = atan2(-accX, sqrt(accY² + accZ²))
  float pitch = atan2(-a.acceleration.x,
                      sqrt(a.acceleration.y * a.acceleration.y +
                           a.acceleration.z * a.acceleration.z));
  return pitch * 180 / PI;  // Convert to degrees
}

float getRoll() {
  sensors_event_t a, g, temp;
  mpu.getEvent(&a, &g, &temp);

  // roll = atan2(accY, accZ)
  float roll = atan2(a.acceleration.y, a.acceleration.z);
  return roll * 180 / PI;
}Note: Tilt angles calculated by accelerometer are inaccurate in dynamic scenarios (because motion acceleration interferes). In this case, you need to fuse gyroscope data using Kalman filter or complementary filter.
Common Problem Troubleshooting
Problem 1: All Readings Are 0
Possible causes:
-
Wiring error (SCL/SDA reversed)
-
I2C address incorrect (MPU6050 defaults to 0x68, ADO connected to VCC becomes 0x69)
-
Insufficient power voltage
Solution:
// Scan I2C devices
void scanI2C() {
  byte count = 0;
  for (byte addr = 1; addr < 127; addr++) {
    Wire.beginTransmission(addr);
    if (Wire.endTransmission() == 0) {
      Serial.print("Found device: 0x");
      Serial.println(addr, HEX);
      count++;
    }
  }
  if (count == 0) Serial.println("No I2C devices found");
}
Problem 2: Data Noise Is Large, Jumping Obvious
Possible causes:
-
Mechanical vibration interference
-
Large power supply ripple
-
Filter bandwidth set too high
Solution:
// Reduce filter bandwidth (trade response speed for stability)
mpu.setFilterBandwidth(MPU6050_BAND_5_HZ);

// Software filtering: moving average
#define SAMPLE_COUNT 10
float readAccelerometerX() {
  float sum = 0;
  for (int i = 0; i < SAMPLE_COUNT; i++) {
    sensors_event_t a, g, temp;
    mpu.getEvent(&a, &g, &temp);
    sum += a.acceleration.x;
    delay(2);
  }
  return sum / SAMPLE_COUNT;
}
Problem 3: Gyroscope Drift Is Severe
Symptom: Angular velocity doesn’t return to zero when stationary, angle continues to drift after integration.
Cause: Gyroscope has zero bias, needs calibration.
Solution:
// Calibrate zero bias (run when device is stationary)
float gyroBiasX = 0, gyroBiasY = 0, gyroBiasZ = 0;
void calibrateGyro() {
  Serial.println("Calibrating... Please keep device stationary");
  delay(1000);

  for (int i = 0; i < 100; i++) {
    sensors_event_t a, g, temp;
    mpu.getEvent(&a, &g, &temp);
    gyroBiasX += g.gyro.x;
    gyroBiasY += g.gyro.y;
    gyroBiasZ += g.gyro.z;
    delay(5);
  }

  gyroBiasX /= 100;
  gyroBiasY /= 100;
  gyroBiasZ /= 100;

  Serial.print("Bias: X="); Serial.print(gyroBiasX);
  Serial.print(" Y="); Serial.print(gyroBiasY);
  Serial.print(" Z="); Serial.println(gyroBiasZ);
}

// Subtract bias when using
float getGyroX() {
  sensors_event_t a, g, temp;
  mpu.getEvent(&a, &g, &temp);
  return g.gyro.x - gyroBiasX;
}
Advanced: Sensor Fusion
Single sensors have limitations:
-
Accelerometer: Accurate when static, but motion interferes when dynamic
-
Gyroscope: Accurate when dynamic, but long-term integration drifts
Solution: Use complementary filter or Kalman filter to fuse both.
Complementary filter is simple and effective:
float pitch = 0;
void updatePitch(float dt) {
  sensors_event_t a, g, temp;
  mpu.getEvent(&a, &g, &temp);

  // Pitch calculated from accelerometer
  float accPitch = atan2(-a.acceleration.x,
                         sqrt(a.acceleration.y * a.acceleration.y +
                              a.acceleration.z * a.acceleration.z)) * 180 / PI;

  // Pitch integrated from gyroscope
  pitch = pitch + g.gyro.y * dt;

  // Complementary filter: 98% trust gyroscope, 2% trust accelerometer
  pitch = 0.98 * pitch + 0.02 * accPitch;
}
Selection Summary
Finally, here’s a quick selection table:
| Requirement | Recommended Model | Reason |
|---|---|---|
| Beginner learning, low cost | MPU6050 | Cheap, lots of documentation, sufficient |
| High precision attitude calculation | ICM20948 | Low noise, 9-axis (with magnetometer) |
| Industrial vibration monitoring | BMI088 | High range, shock resistant, wide temperature |
| Pure tilt detection | ADXL345 | Single function, low power |
| Pure rotation detection | L3GD20H | Single function, cost-effective |
Procurement Suggestions:
-
Buy modules (with voltage regulation and level shifting) on Taobao/1688, more convenient than bare chips
-
Note the difference between “breakout boards” and “development boards” - the former is just sensor + minimal peripherals
-
For bulk procurement, you can get chips from distributors, reducing cost by 30-50%
Hope this blog post is helpful to you!