 Artificial Intelligence
 CoLab - Image Face Detection: Drawing Boxes Around Faces
This tutorial teaches you how to use Google Colaboratory for face recognition and drawing bounding boxes on static images.
CoLab’s Biggest Advantage: Fast GPU Computing Speed!
Note:
· Accessing Colab in China requires a VPN;
· Beginners new to Colab should search and familiarize yourself with basic operations first;
· You can try running the code on Jetson Nano or other GPU-equipped environments;
· The ipynb format tutorial link is here.
Preparation & Installing Libraries
1) Enable GPU Support in CoLab
Top menu bar ➡ Runtime ➡ Change runtime type ➡ Notebook settings ➡ Hardware accelerator: GPU
2) Install: Dependencies
Install some basic libraries through apt to support numpy and dlib operation (Note: CuLab already has numpy built-in)
!sudo apt-get update
!sudo apt-get install python3-pip cmake libopenblas-dev liblapack-dev libjpeg-dev
!pip3 install numpy
3) Install: Dlib Deep Learning Library
The deep learning library created by master Davis King greatly improves the efficiency of the face_recognition library.
Download dlib, extract the code, install dlib (It takes about 10 minutes to install in CuLab environment, please be patient)
!wget http://dlib.net/files/dlib-19.17.tar.bz2
!tar jxvf dlib-19.17.tar.bz2
!cd dlib-19.17;python setup.py install
4) Install: Face Recognition Library Face_recognition
After completing the above, we start installing the face recognition Python library face_recognition:
!sudo pip3 install face_recognitionLoad master Adam Geitgey’s source code from GitHub
!git clone https://github.com/ageitgey/face_recognition.git(1) Drawing Boxes Around Faces (Step-by-step guide)
Load face recognition, OpenCV and MatPlotlib libraries
import face_recognition
import cv2
import matplotlib.pyplot as plt
First, download an Avengers group photo, wget it to the “Files” root directory, and rename it to avengers_cast.jpeg
Then use load_image_file to convert the image file to array data, and use MatPlotlib’s imshow to output the original image.
!wget https://www.cheatsheet.com/wp-content/uploads/2019/05/The-Avengers-Cast-640x427.jpg -O avengers_cast.jpegimage = face_recognition.load_image_file("/content/avengers_cast.jpeg")
plt.imshow(image)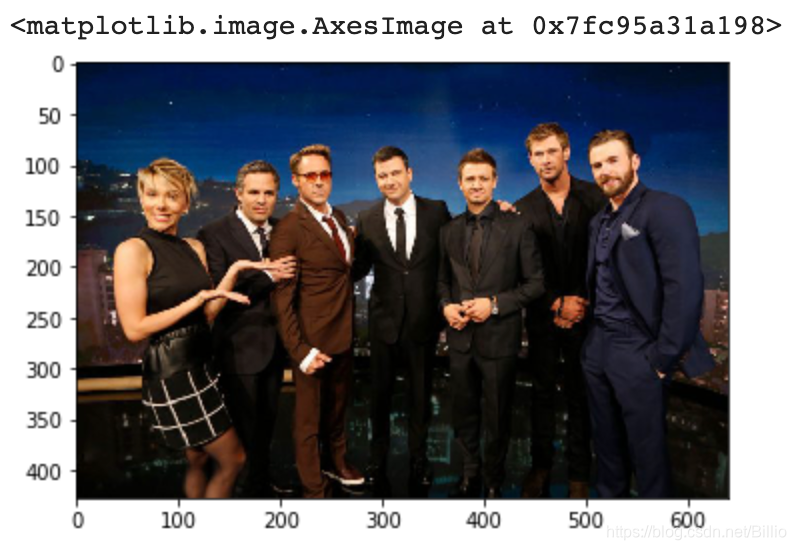 The face_locations module processes the image data and locates face positions: four values ➡ two coordinates: y1,x1,y2,x2
face_locations = face_recognition.face_locations(image)
#Count how many faces are detected
print("Number of faces detected in image:", len(face_locations))
#Output all face location data
print (face_locations)
Get the following results:
**
Number of faces detected in image: 7 [(118, 197, 154, 161), (98, 325, 134, 289), (98, 253, 134, 217), (103, 415, 146, 371), (84, 544, 127, 501), (78, 481, 114, 445), (118, 103, 161, 59)]
Use cv2’s rectangle function to draw boxes: Reference function explanation OpenCV Python 2D Drawing Rectangles
#Draw box for the first face (note the x,y value input order)
img_test = cv2.rectangle(image, (face_locations[0][1], face_locations[0][0]), (face_locations[0][3], face_locations[0][2]), (255,0,0),5)
#Output effect image
plt.imshow(img_test)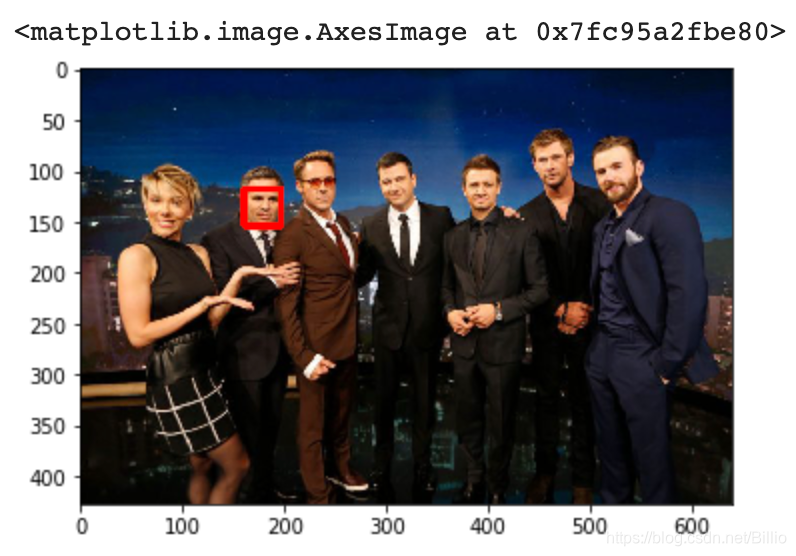 Write a loop to draw boxes around all faces:
#Draw boxes around all faces
for i in face_locations:
img1_detect = cv2.rectangle(image, (i[1], i[0]), (i[3], i[2]), (255,0,0),5)
#Output effect image
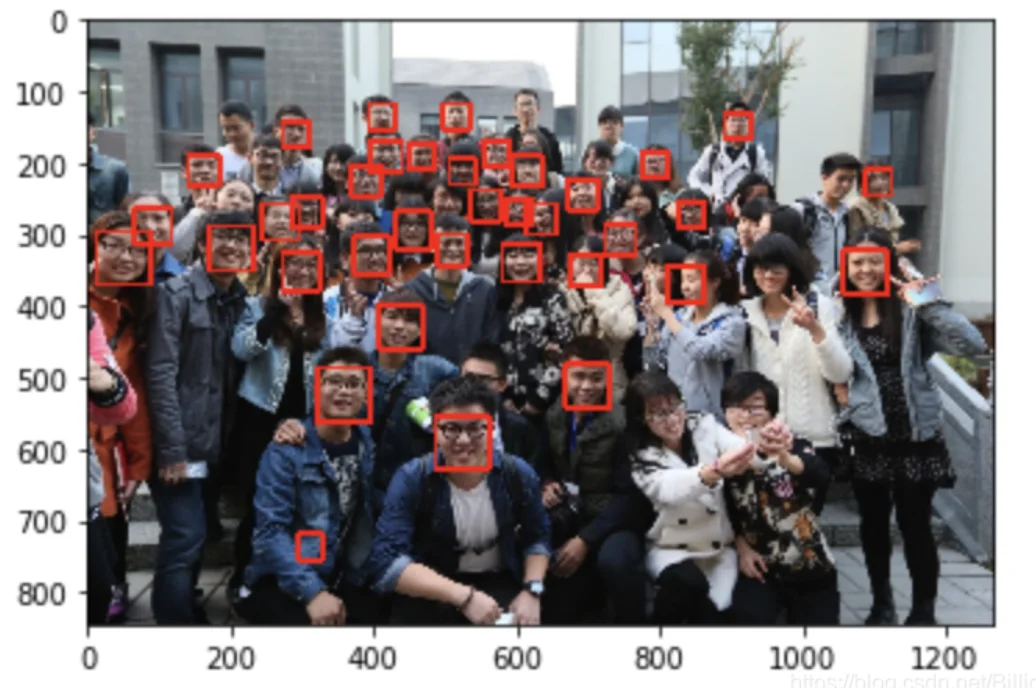
plt.imshow(img1_detect)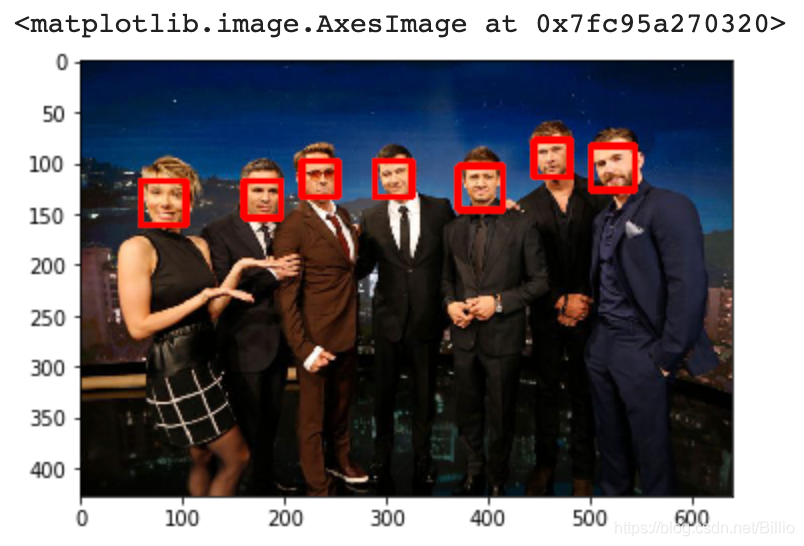 Next, let me try more cases: Jack Ma and alumni group photo
#Case 2: Download image
!wget http://5b0988e595225.cdn.sohucs.com/images/20180513/0b958761ba0f4b99b35747ac656f4ec4.jpeg -O Jack_Ma_schoolmates.jpeg
#Convert image data and assign to img2
img2 = face_recognition.load_image_file("/content/Jack_Ma_schoolmates.jpeg")
#Detect face data
face_locations_img2 = face_recognition.face_locations(img2)
#Draw boxes around all faces
for i in face_locations_img2:
img2_detect = cv2.rectangle(img2, (i[1], i[0]), (i[3], i[2]), (255,0,0), 5)
#Output effect image
plt.imshow(img2_detect)
#Count how many faces are detected
print("Total number of faces in image:", len(face_locations_img2))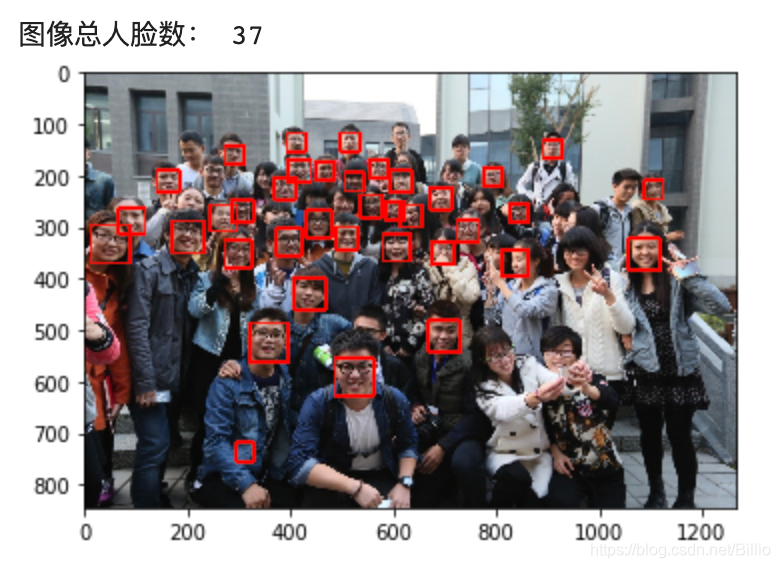 From the above example, we can see that this face recognition is not perfect:
Some people were not detected and boxed, and a blue-shirted person in the front row was mistakenly identified as a face on their clothing!
Why is this? It’s because this project’s face recognition is based on the deep learning model from the C++ open-source library dlib, trained with the Labeled Faces in the Wild face dataset. The face data in this library is almost all foreign adults… Therefore,
This face recognition model’s accuracy for Asian and children’s faces still needs improvement**.
Complete Code Analysis
Let’s understand the principles of each step in the above code in more detail.
How face_recognition Library Works
The face_recognition library is based on dlib’s deep learning model. The workflow is as follows:
- Face Detection: Uses HOG (Histogram of Oriented Gradients) features or CNN convolutional neural network to find face regions in the image
- Face Alignment: Detects 68 facial landmarks (eyes, nose, mouth contour, etc.) and aligns the face to a standard position
- Feature Extraction: Passes the aligned face through a deep learning model to extract a 128-dimensional feature vector
- Face Comparison: Determines if two faces are the same person by calculating the Euclidean distance between them (smaller distance means more similar)
face_locations Function Parameters
face_locations = face_recognition.face_locations(image, number_of_times_to_upsample=1, model="hog")number_of_times_to_upsample: Number of times to upsample the image. Larger values can detect smaller faces but are slower. Default is 1, can be changed to 2 if faces in the image are very smallmodel: Detection model."hog"is fast but poor for side faces,"cnn"is more accurate but requires GPU support. In Colab, it’s recommended to use"cnn"mode
# Use CNN mode (more accurate)
face_locations = face_recognition.face_locations(image, model="cnn")
Adding Labels to Recognition Results
The examples above only drew face boxes. Next, let’s learn how to add name labels to each detected face:
import face_recognition
import cv2
import matplotlib.pyplot as plt
import numpy as np

# Load image
image = face_recognition.load_image_file("/content/avengers_cast.jpeg")

# Detect face locations
face_locations = face_recognition.face_locations(image)

# Get face encodings (128-dimensional vectors) for each face
face_encodings = face_recognition.face_encodings(image, face_locations)

# Make a copy of the image for drawing
image_with_labels = image.copy()

# Preset name list (needs to correspond to actually detected faces)
# In practice, you need to train corresponding encodings with photos of known people first
known_names = ["Actor1", "Actor2", "Actor3", "Actor4", "Actor5", "Actor6", "Actor7"]

for i, (face_encoding, face_loc) in enumerate(zip(face_encodings, face_locations)):
    top, right, bottom, left = face_loc

    # Get name (if not preset, display "Unknown")
    name = known_names[i] if i < len(known_names) else "Unknown"

    # Draw face box (red)
    cv2.rectangle(image_with_labels, (left, top), (right, bottom), (255, 0, 0), 3)

    # Draw label background (blue rectangle)
    cv2.rectangle(image_with_labels, (left, bottom - 25), (right, bottom), (0, 0, 255), cv2.FILLED)

    # Write name
    font = cv2.FONT_HERSHEY_DUPLEX
    cv2.putText(image_with_labels, name, (left + 6, bottom - 6), font, 0.6, (255, 255, 255), 1)

plt.figure(figsize=(12, 8))
plt.imshow(image_with_labels)
plt.axis('off')
plt.show()
Comparison with Other Face Detection Methods
face_recognition is not the only face detection solution. Let’s compare several common methods:
OpenCV Haar Cascade Classifier
OpenCV’s built-in face detector based on Haar features:
import cv2

# Load Haar cascade classifier
face_cascade = cv2.CascadeClassifier(cv2.data.haarcascades + 'haarcascade_frontalface_default.xml')

# Read image and convert to grayscale
image = cv2.imread("/content/avengers_cast.jpeg")
gray = cv2.cvtColor(image, cv2.COLOR_BGR2GRAY)

# Detect faces
faces = face_cascade.detectMultiScale(gray, scaleFactor=1.1, minNeighbors=5, minSize=(30, 30))

print(f"Detected {len(faces)} faces")

for (x, y, w, h) in faces:
    cv2.rectangle(image, (x, y), (x+w, y+h), (0, 255, 0), 3)

# OpenCV displays in BGR, Matplotlib needs RGB
plt.imshow(cv2.cvtColor(image, cv2.COLOR_BGR2RGB))
plt.show()
Haar Cascade Pros and Cons:
- Pros: Extremely fast, doesn’t need deep learning libraries, built into OpenCV
- Cons: Low accuracy, poor performance with side faces and occlusion, can only detect not identify
MediaPipe Face Detection
Google’s MediaPipe framework, suitable for mobile and real-time scenarios:
# Install MediaPipe
!pip install mediapipe

import mediapipe as mp
import cv2

mp_face_detection = mp.solutions.face_detection
mp_drawing = mp.solutions.drawing_utils

image = cv2.imread("/content/avengers_cast.jpeg")
image_rgb = cv2.cvtColor(image, cv2.COLOR_BGR2RGB)

with mp_face_detection.FaceDetection(model_selection=1, min_detection_confidence=0.5) as face_detection:
    results = face_detection.process(image_rgb)

    if results.detections:
        print(f"Detected {len(results.detections)} faces")
        for i, detection in enumerate(results.detections):
            bbox = detection.location_data.relative_bounding_box
            h, w, _ = image.shape
            x, y = int(bbox.xmin * w), int(bbox.ymin * h)
            width, height = int(bbox.width * w), int(bbox.height * h)
            cv2.rectangle(image, (x, y), (x+width, y+height), (0, 255, 0), 3)

plt.imshow(cv2.cvtColor(image, cv2.COLOR_BGR2RGB))
plt.show()
MediaPipe Pros and Cons:
- Pros: Fast, suitable for real-time video, supports facial landmark detection
- Cons: Can only detect, not directly identify identity
Three Methods Summary Comparison
| Feature | face_recognition (dlib) | OpenCV Haar | MediaPipe |
|---|---|---|---|
| Detection Speed | Medium | Extremely Fast | Fast |
| Detection Accuracy | High | Medium | High |
| Can Identify Identity | ✅ Yes | ❌ No | ❌ No |
| GPU Acceleration | Required (CNN mode) | Not Required | Optional |
| Asian Face Accuracy | Medium | Medium | Relatively High |
| Suitable Scenarios | Face recognition, access control | Simple counting | Real-time video |
Running Outside Colab: Local and Jetson Nano Deployment
Running on Local Computer
The above code can also run on a local computer, just note the following:
# 1. Install Python dependencies
pip3 install face_recognition opencv-python matplotlib numpy

# 2. If face_recognition installation fails, you need to install dlib first
# macOS
brew install cmake
brew install openblas

# Ubuntu/Debian
sudo apt install cmake libopenblas-dev liblapack-dev libjpeg-dev

# Windows
# Recommended to use pre-compiled dlib wheel files:
# pip install dlib-19.xx-cpxx-cpxx-win_amd64.whl (download from GitHub releases)

pip3 install dlib
pip3 install face_recognition
The code for local running is almost identical to Colab, just replace the !wget image download command with local file paths.
Running on Jetson Nano
Jetson Nano has built-in GPU acceleration, very suitable for real-time face recognition. But there are some considerations during installation:
# 1. Ensure JetPack is installed (recommended 4.3 or above)
# 2. Install system dependencies
sudo apt update
sudo apt install python3-pip cmake libopenblas-dev liblapack-dev libjpeg-dev

# 3. Install numpy (usually comes with JetPack)
pip3 install numpy

# 4. Compile and install dlib (takes about 30 minutes on Jetson Nano)
# Recommended to enable maximum CPU cores to speed up compilation
wget http://dlib.net/files/dlib-19.17.tar.bz2
tar jxvf dlib-19.17.tar.bz2
cd dlib-19.17
python3 setup.py install --yes USE_AVX_INSTRUCTIONS

# 5. Install face_recognition
pip3 install face_recognition

# 6. Install OpenCV (comes with JetPack or install separately)
sudo apt install python3-opencv
Jetson Nano Real-time Face Detection Example:
import face_recognition
import cv2

# Open USB camera
video_capture = cv2.VideoCapture(0)

while True:
    # Read one frame (reduce size to speed up)
    ret, frame = video_capture.read()
    if not ret:
        break

    # Resize frame to 1/4 size to speed up processing
    small_frame = cv2.resize(frame, (0, 0), fx=0.25, fy=0.25)

    # Convert to RGB (OpenCV defaults to BGR)
    rgb_small_frame = small_frame[:, :, ::-1]

    # Detect faces
    face_locations = face_recognition.face_locations(rgb_small_frame)

    # Draw face boxes on original frame (coordinates need to be multiplied by 4 to restore)
    for (top, right, bottom, left) in face_locations:
        top *= 4
        right *= 4
        bottom *= 4
        left *= 4
        cv2.rectangle(frame, (left, top), (right, bottom), (0, 0, 255), 2)

    # Display result
    cv2.imshow('Face Detection', frame)

    # Press q to exit
    if cv2.waitKey(1) & 0xFF == ord('q'):
        break

video_capture.release()
cv2.destroyAllWindows()
When running real-time face recognition on Jetson Nano, the frame rate is about 2-5 FPS. If you need a higher frame rate, you can use dlib’s HOG mode instead of CNN mode, or use more lightweight solutions like MediaPipe.
Hope these supplementary contents help you more comprehensively understand face detection technology and flexibly apply it on different platforms!