 ESP32
ESP32 ESP32引脚图完整指南2026|GPIO分配 + 功能说明 + 实物图
ESP32 C3简介
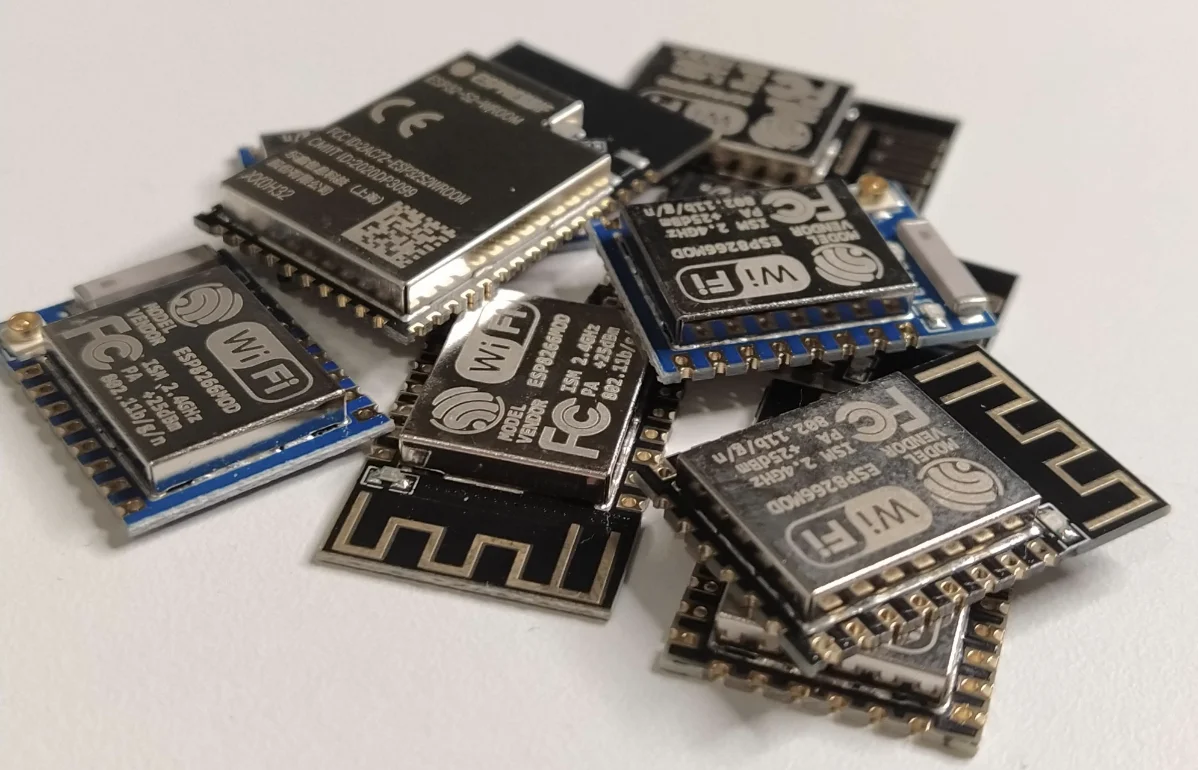
ESP32-C3是乐鑫公司开发了的一款低成本的MCU模块,它能满足常见的物联网产品功能需求,同时大幅度提升产品的安全性能。ESP32 C3模块的价格和ESP8266差不多,但性能确比ESP6266强。ESP32-C3模块的设计有以下几个特色,
-
部分GPIO支持RTC功能,可用于低功耗深度睡眠模式下的唤醒
-
可配置的模拟功能包括ADC(模数转换)用于读取模拟传感器数据
-
部分引脚支持触摸感应功能,可替代物理按键实现触摸交互
引脚图和原理图
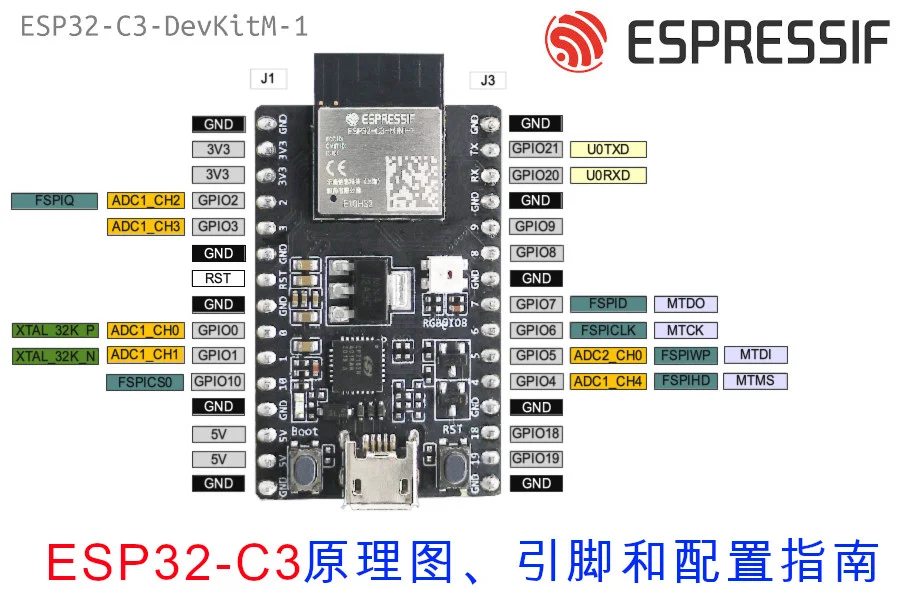
ESP32-C3-DevKitM的引脚布局
由于现在模块还比较新,因此价格还没下来,在乐鑫的官方淘宝上售价60元,还有15元的邮费,因此成本75元。
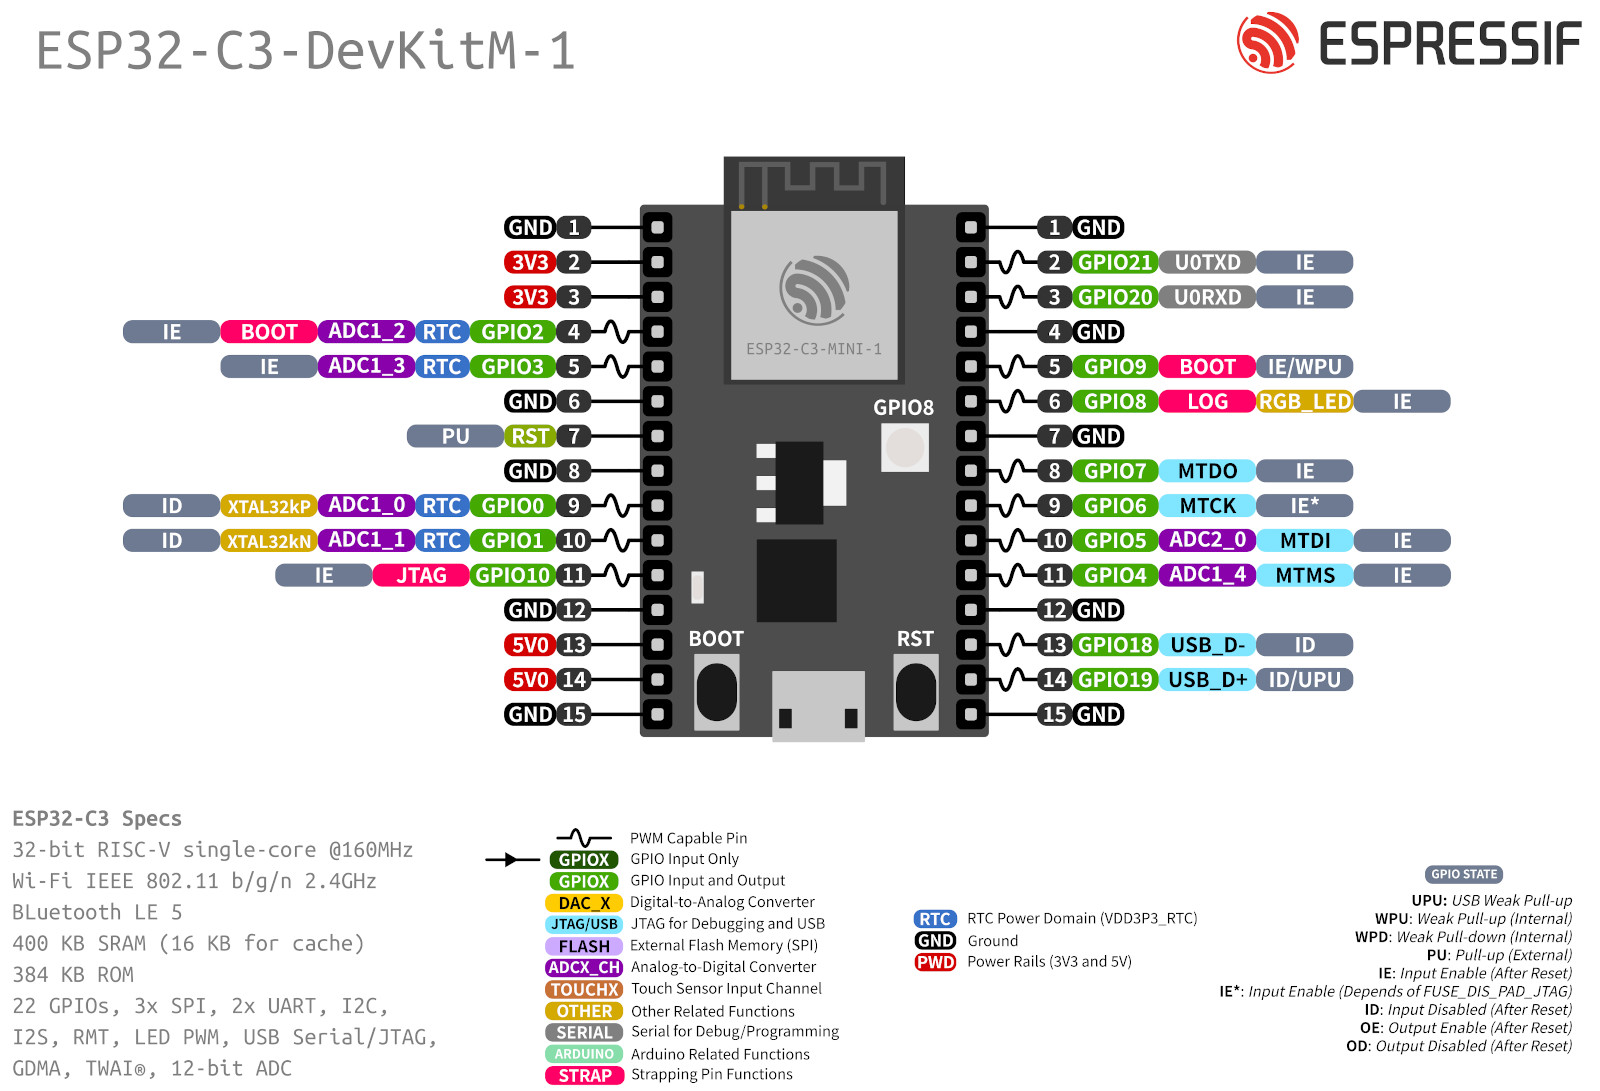 这里是开发板的原理图
引脚列表
.pow33v, .pow5v { border: 8px solid red!important; } .i2c { border: 8px solid #fc4cfc!important; } .i2s { border: 8px solid #63c9cb!important; } .uart { border: 8px solid gray!important; } .spi { border: 8px solid #343ffb!important; } .gnd { background-color: black!important; line-height: 19px; border: 8px solid yellow!important; color: #ffffff; } .pin { background-color: white; width: 35px; height: 35px; line-height: 17px; position: relative; border: 8px solid green; border-radius: 100%; text-align: center; margin: 0px auto; } .pow33v-bg, .pow5v-bg{ background-color: red !important; color: white !important; } .gnd-bg { background-color: black !important; color: white !important; } .i2c-bg { background-color: #fecdfe !important; } .i2s-bg { background-color: #d0e7f4 !important; } .spi-bg { background-color: #d0e7f4 !important; } .uart-bg { background-color: gray !important; color: white !important; } .i2s-bg { background-color: #d0f7fa !important; } .gpio-bg { background-color: #cefcce !important; } table#pinout { width:100%; text-align: center; } table img { height:250px; } @media only screen and (max-width: 600px) { table td,table th { padding: 0px; } .mobile { display:block; } table#pinout{ display:none; } } @media only screen and (min-width: 601px) { .mobile { display:none; } table#pinout{ display:block; } }
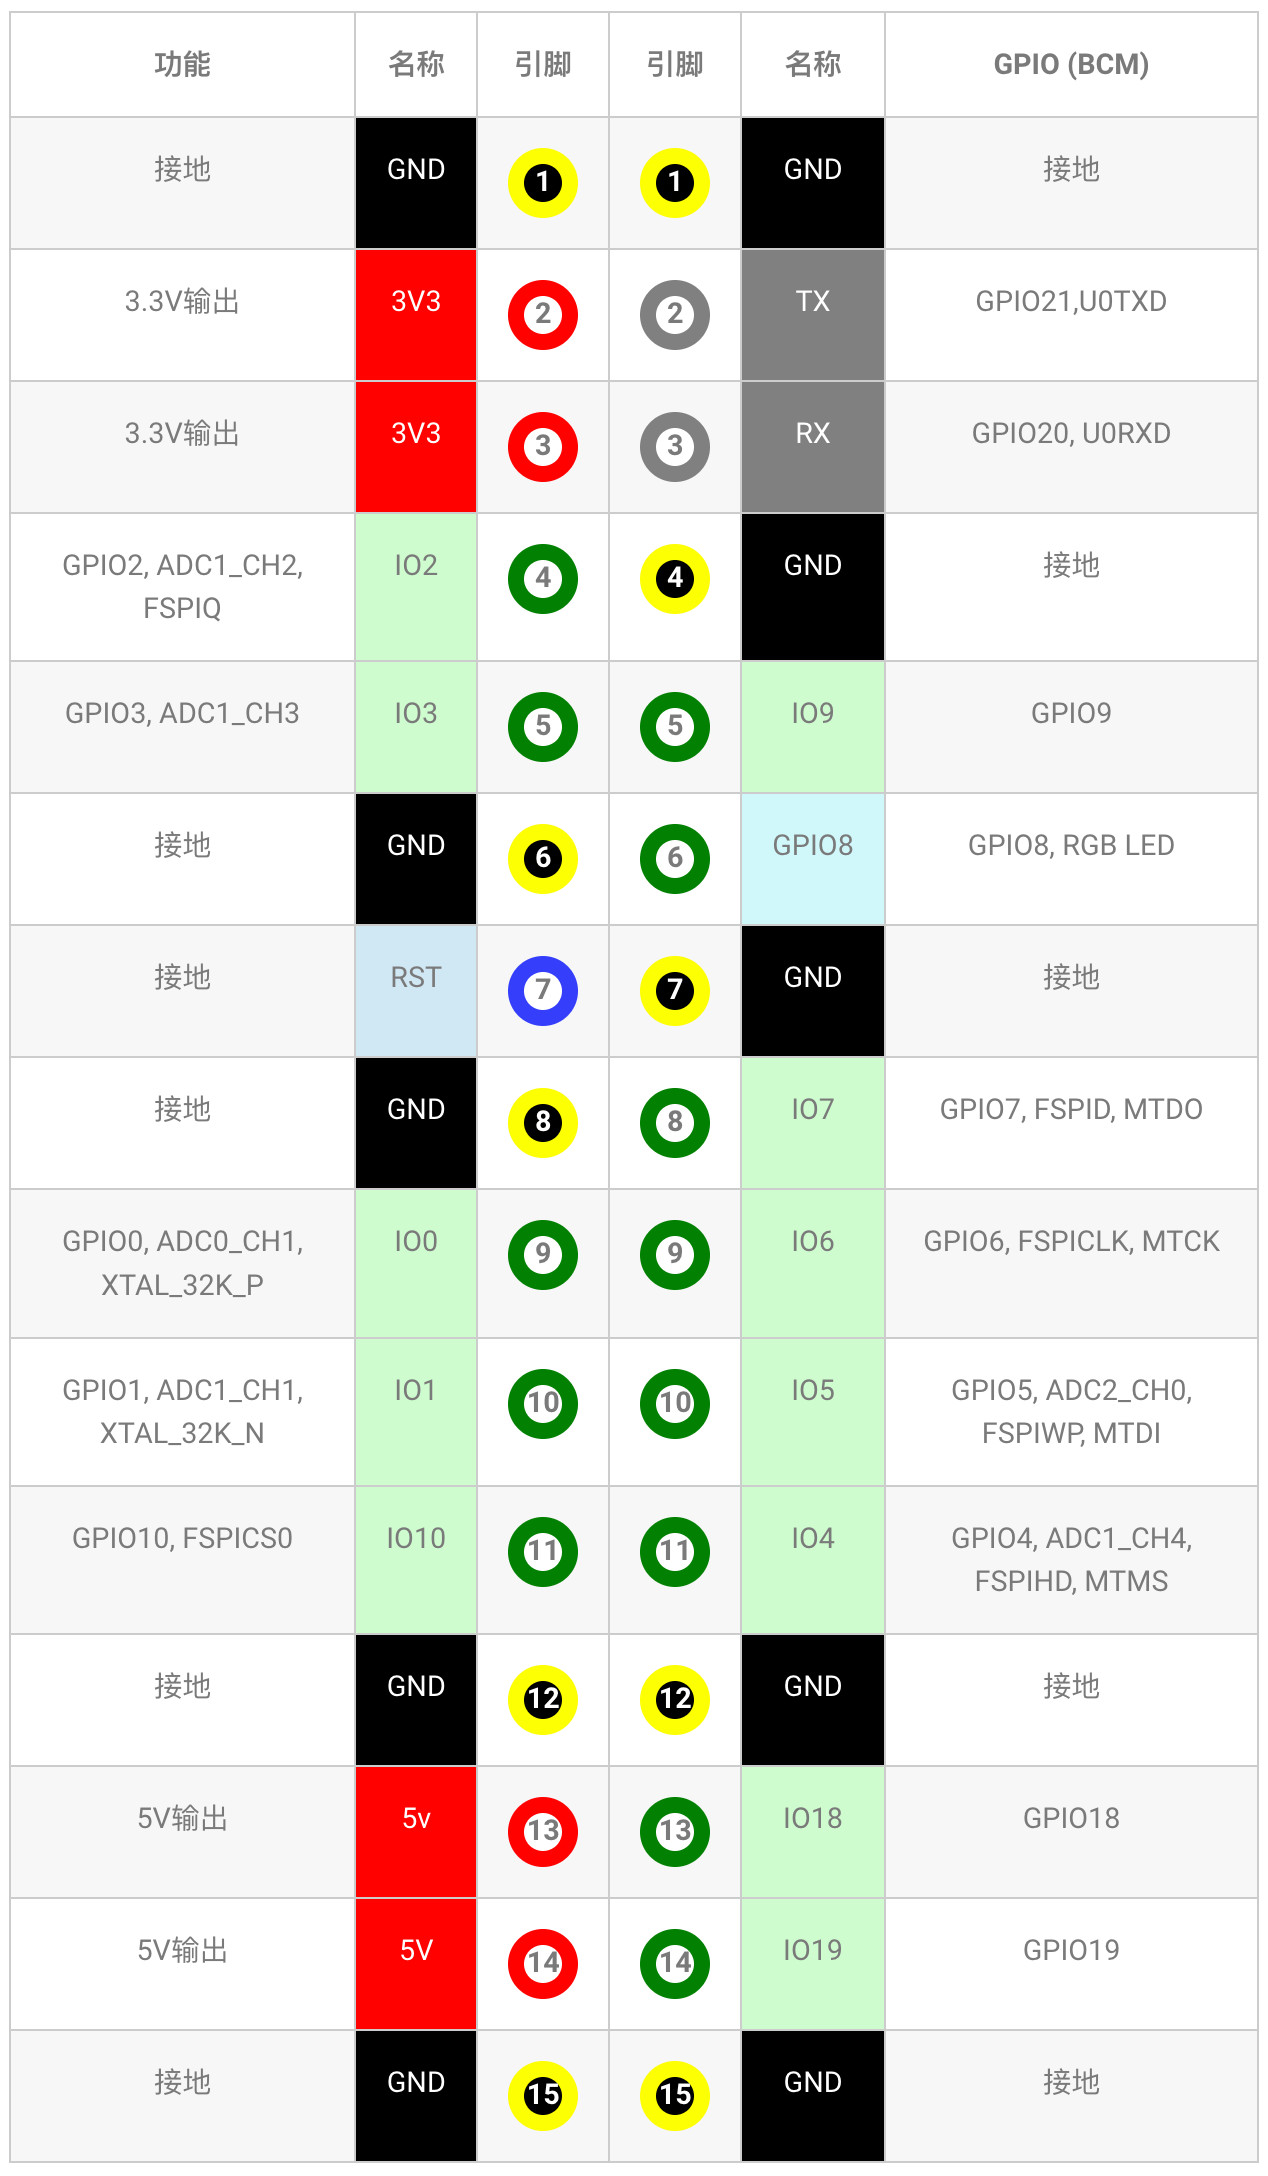
| 功能 | 名称 | 引脚 | 引脚 | 名称 | GPIO (BCM) |
|---|---|---|---|---|---|
| 接地 | GND | 1 | 1 | GND | 接地 |
| 3.3V输出 | 3V3 | 2 | 2 | TX | GPIO21,U0TXD |
| 3.3V输出 | 3V3 | 3 | 3 | RX | GPIO20, U0RXD |
| GPIO2, ADC1_CH2, FSPIQ | IO2 | 4 | 4 | GND | 接地 |
| GPIO3, ADC1_CH3 | IO3 | 5 | 5 | IO9 | GPIO9 |
| 接地 | GND | 6 | 6 | GPIO8 | GPIO8, RGB LED |
| 接地 | RST | 7 | 7 | GND | 接地 |
| 接地 | GND | 8 | 8 | IO7 | GPIO7, FSPID, MTDO |
| GPIO0, ADC0_CH1, XTAL_32K_P | IO0 | 9 | 9 | IO6 | GPIO6, FSPICLK, MTCK |
| GPIO1, ADC1_CH1, XTAL_32K_N | IO1 | 10 | 10 | IO5 | GPIO5, ADC2_CH0, FSPIWP, MTDI |
| GPIO10, FSPICS0 | IO10 | 11 | 11 | IO4 | GPIO4, ADC1_CH4, FSPIHD, MTMS |
| 接地 | GND | 12 | 12 | GND | 接地 |
| 5V输出 | 5v | 13 | 13 | IO18 | GPIO18 |
| 5V输出 | 5V | 14 | 14 | IO19 | GPIO19 |
| 接地 | GND | 15 | 15 | GND | 接地 |
上传代码
1. 驱动
由于ESP 32 C3使用的串口驱动是CH341,比较新,因此使用以前的ESP32并不通用,我们需要为它安装新的驱动程序。 Windows 驱动程序 Mac 驱动程序
2. 配置PlatformIO
我们用Platform IO比较多,所以先介绍PlatformIO的配置,PlatformIO需要修改platform和platform_packages才能正常使用。
platform = https://github.com/tasmota/platform-espressif32/releases/download/v2.0.3rc1/platform-espressif32-2.0.3.zip
board = esp32-c3-devkitm-1
framework = arduino
platform_packages =
framework-arduinoespressif32 @ https://github.com/espressif/arduino-esp32#master
board_build.f_flash = 80000000L
board_build.flash_mode = dio
monitor_speed = 115200
3. 配置Arduino
先在附加开发板管理器网址增加以下的网址,
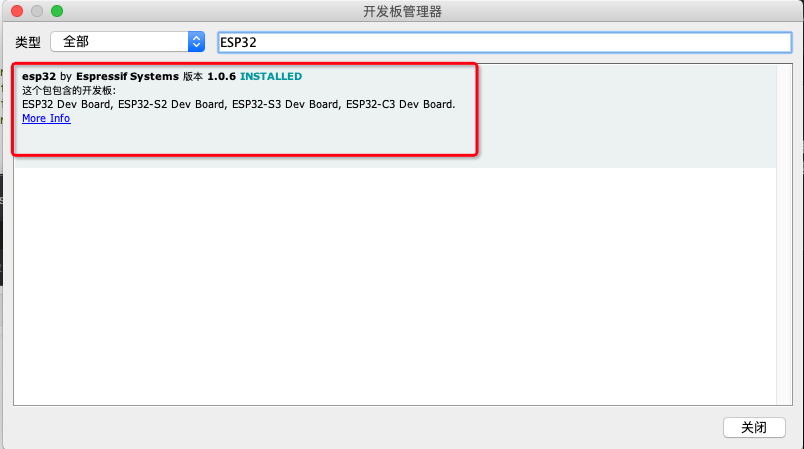
https://raw.githubusercontent.com/espressif/arduino-esp32/gh-pages/package_esp32_dev_index.json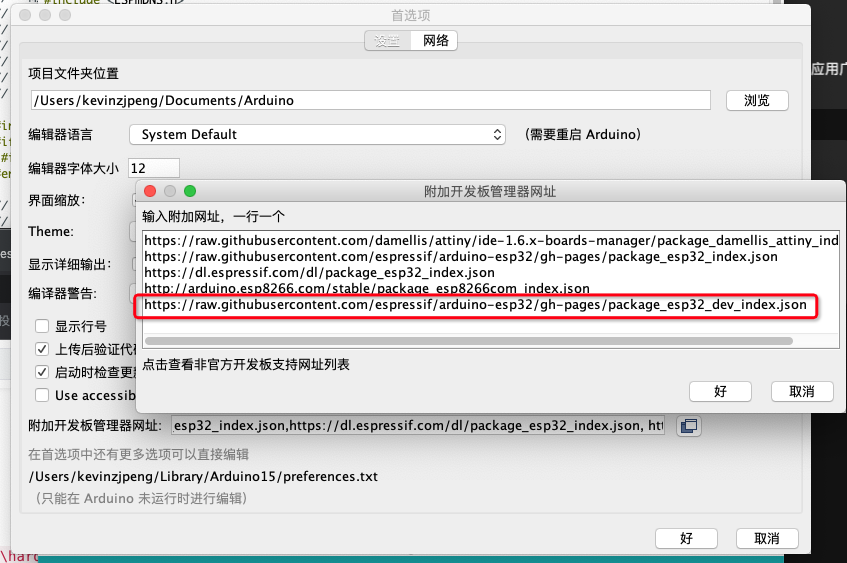 然后再搜索ESP32,即可找到支持C3的ESP32开发板,并安装。
ESP32-C3 开发实战
1. 快速开始项目
项目结构:
my_project/
├── src/
│   └── main.cpp
├── include/
│   └── config.h
├── lib/
├── test/
├── platformio.ini
└── README.mdplatformio.ini配置:
[env:esp32-c3]
platform = espressif32
board = esp32-c3-devkitm-1
framework = arduino
monitor_speed = 115200

; 库依赖
lib_deps =
    WiFi
    ESPAsyncWebServer
    ArduinoJson

; 编译选项
build_flags =
    -D CORE_DEBUG_LEVEL=3
    -D ARDUINO_USB_MODE=1
    -D ARDUINO_USB_CDC_ON_BOOT=1
2. WiFi + Web服务器示例
#include <WiFi.h>
#include <ESPAsyncWebServer.h>
#include <ArduinoJson.h>

const char* ssid = "your_ssid";
const char* password = "your_password";

AsyncWebServer server(80);

void setup() {
  Serial.begin(115200);

  // 连接WiFi
  WiFi.begin(ssid, password);
  while (WiFi.status() != WL_CONNECTED) {
    delay(1000);
    Serial.println("Connecting to WiFi...");
  }
  Serial.println("Connected!");
  Serial.println(WiFi.localIP());

  // Web服务器路由
  server.on("/", HTTP_GET, [](AsyncWebServerRequest *request){
    request->send(200, "text/html", "<h1>ESP32-C3 Web Server</h1>");
  });

  // JSON API
  server.on("/api/status", HTTP_GET, [](AsyncWebServerRequest *request){
    StaticJsonDocument<200> doc;
    doc["wifi_rssi"] = WiFi.RSSI();
    doc["free_heap"] = ESP.getFreeHeap();
    doc["uptime"] = millis() / 1000;

    String response;
    serializeJson(doc, response);
    request->send(200, "application/json", response);
  });

  // 读取GPIO
  server.on("/api/gpio/{pin}", HTTP_GET, [](AsyncWebServerRequest *request){
    int pin = request->pathParam(0).toInt();
    int value = digitalRead(pin);
    request->send(200, "text/plain", String(value));
  });

  server.begin();
}

void loop() {
  // 主循环
}
3. 低功耗应用
#include <esp_sleep.h>

#define WAKEUP_PIN 2
#define SLEEP_TIME 10  // 秒

void setup() {
  Serial.begin(115200);

  // 配置唤醒引脚
  pinMode(WAKEUP_PIN, INPUT_PULLUP);

  // 检查唤醒原因
  esp_sleep_wakeup_cause_t cause = esp_sleep_get_wakeup_cause();
  switch(cause) {
    case ESP_SLEEP_WAKEUP_EXT0:
      Serial.println("Wakeup by external signal");
      break;
    case ESP_SLEEP_WAKEUP_TIMER:
      Serial.println("Wakeup by timer");
      break;
    default:
      Serial.println("First boot");
  }

  // 执行任务
  do_work();

  // 进入深度睡眠
  enter_deep_sleep();
}

void do_work() {
  Serial.println("Doing work...");
  delay(1000);
}

void enter_deep_sleep() {
  // 配置定时器唤醒
  esp_sleep_enable_timer_wakeup(SLEEP_TIME * 1000000);

  // 配置外部唤醒(低电平触发)
  esp_sleep_enable_ext0_wakeup((gpio_num_t)WAKEUP_PIN, LOW);

  Serial.println("Going to sleep...");
  Serial.flush();

  // 进入深度睡眠
  esp_deep_sleep_start();
}

void loop() {
  // 不会执行到这里
}
4. USB CDC 串口使用
// ESP32-C3支持USB CDC,无需外部USB转串口芯片

void setup() {
  // 初始化USB CDC
  Serial.begin(115200);

  // 等待USB连接
  while(!Serial) {
    delay(100);
  }

  Serial.println("USB CDC Ready!");
}

void loop() {
  if (Serial.available()) {
    String input = Serial.readStringUntil('\n');
    Serial.println("Received: " + input);

    // 处理命令
    if (input == "LED ON") {
      digitalWrite(LED_BUILTIN, HIGH);
    } else if (input == "LED OFF") {
      digitalWrite(LED_BUILTIN, LOW);
    }
  }
}
5. RISC-V特有功能
// ESP32-C3使用RISC-V架构,有一些特有优化

// 1. 使用硬件乘法器
int32_t fast_multiply(int32_t a, int32_t b) {
  // RISC-V有硬件乘法指令
  return a * b;
}

// 2. 使用位操作优化
uint32_t count_bits(uint32_t n) {
  // RISC-V支持位计数指令
  uint32_t count = 0;
  while (n) {
    count += n & 1;
    n >>= 1;
  }
  return count;
}

// 3. 使用中断优化
void IRAM_ATTR fast_interrupt_handler() {
  // IRAM_ATTR将函数放入快速RAM
  // 减少中断延迟
  GPIO.out_w1ts = (1 << LED_PIN);
}

void setup() {
  // 配置中断
  attachInterrupt(digitalPinToInterrupt(2),
                  fast_interrupt_handler,
                  FALLING);
}
6. 蓝牙BLE应用
#include <BLEDevice.h>
#include <BLEUtils.h>
#include <BLEServer.h>

#define SERVICE_UUID        "4fafc201-1fb5-459e-8fcc-c5c9c331914b"
#define CHARACTERISTIC_UUID "beb5483e-36e1-4688-b7f5-ea07361b26a8"

class MyCharacteristicCallbacks : public BLECharacteristicCallbacks {
  void onWrite(BLECharacteristic *pCharacteristic) {
    String value = pCharacteristic->getValue();
    if (value.length() > 0) {
      Serial.println("Received: " + value);

      // 控制LED
      if (value == "ON") {
        digitalWrite(LED_BUILTIN, HIGH);
      } else if (value == "OFF") {
        digitalWrite(LED_BUILTIN, LOW);
      }
    }
  }
};

void setup() {
  Serial.begin(115200);
  pinMode(LED_BUILTIN, OUTPUT);

  // 初始化BLE
  BLEDevice::init("ESP32-C3-BLE");

  // 创建服务器
  BLEServer *pServer = BLEDevice::createServer();

  // 创建服务
  BLEService *pService = pServer->createService(SERVICE_UUID);

  // 创建特征
  BLECharacteristic *pCharacteristic = pService->createCharacteristic(
    CHARACTERISTIC_UUID,
    BLECharacteristic::PROPERTY_READ |
    BLECharacteristic::PROPERTY_WRITE
  );

  pCharacteristic->setCallbacks(new MyCharacteristicCallbacks());
  pCharacteristic->setValue("Hello BLE");

  // 启动服务和广播
  pService->start();
  BLEAdvertising *pAdvertising = BLEDevice::getAdvertising();
  pAdvertising->addServiceUUID(SERVICE_UUID);
  pAdvertising->setScanResponse(true);
  pAdvertising->setMinPreferred(0x06);
  pAdvertising->setMinPreferred(0x12);
  BLEDevice::startAdvertising();

  Serial.println("BLE Ready!");
}

void loop() {
  delay(1000);
}
7. 性能优化技巧
// 1. 使用更快的SPI频率
#include <SPI.h>

void fast_spi_transfer() {
  SPI.begin();
  SPI.setFrequency(40000000);  // 40MHz
  SPI.beginTransaction(SPISettings(40000000, MSBFIRST, SPI_MODE0));

  // 快速传输
  SPI.transfer(0xFF);

  SPI.endTransaction();
}

// 2. 使用DMA提高I2C性能
#include <Wire.h>

void fast_i2c_read() {
  Wire.beginTransmission(0x68);
  Wire.write(0x3B);
  Wire.endTransmission(false);

  // 使用DMA读取
  Wire.requestFrom(0x68, 6, true);

  while (Wire.available()) {
    uint8_t data = Wire.read();
    // 处理数据
  }
}

// 3. 优化内存使用
void memory_optimization() {
  // 使用PROGMEM存储常量
  const char text[] PROGMEM = "Long string";

  // 使用栈而非堆
  uint8_t buffer[256];  // 栈分配
  // uint8_t *buffer = new uint8_t[256];  // 堆分配(慢)

  // 使用结构体打包
  struct __attribute__((packed)) SensorData {
    int16_t x, y, z;
    uint8_t status;
  };
}
8. 常见问题解决
问题1:USB CDC不工作
解决方案:
1. 确保使用正确的USB线缆(支持数据传输)
2. 在platformio.ini中添加:
   build_flags = -D ARDUINO_USB_MODE=1
3. 安装CH343驱动(某些系统需要)
4. 尝试按下BOOT按钮再上电
问题2:WiFi连接不稳定
解决方案:
1. 检查天线连接
2. 降低WiFi发射功率:
   WiFi.setTxPower(WIFI_POWER_8_5dBm);
3. 使用外部天线
4. 避免金属遮挡
问题3:功耗过高
解决方案:
1. 使用深度睡眠模式
2. 关闭未使用的外设:
   WiFi.mode(WIFI_OFF);
   btStop();
3. 降低CPU频率:
   setCpuFrequencyMhz(80);  // 80MHz
4. 使用RTC GPIO保持状态
问题4:编译错误
常见错误及解决:
1. "esp32/c3/xxx.h not found"
   → 更新ESP32开发板包到最新版本

2. "undefined reference to xxx"
   → 检查库依赖是否正确安装

3. "section will not fit"
   → 减少代码大小或优化编译选项
9. 项目创意
-
智能家居传感器节点
- 温湿度、光照、空气质量监测
- WiFi上传数据到云平台
- 低功耗设计,电池供电
-
BLE信标
- 室内定位系统
- 资产追踪
- proximity marketing
-
USB设备模拟器
- HID键盘/鼠标
- 串口设备
- 自定义USB设备
-
物联网网关
- 收集多个传感器数据
- 本地处理和过滤
- 上传到云端
-
无线编程器
- 通过WiFi OTA更新其他设备
- 支持多种协议
- Web界面配置
10. 学习资源
官方资源:
- [ESP32-C3技术参考手册](https://www.espressif.com/sites/default/files/documentation/