 嵌入式开发
嵌入式开发 超声波测距模块 HC-SR04 进阶应用:精度优化与多传感器融合
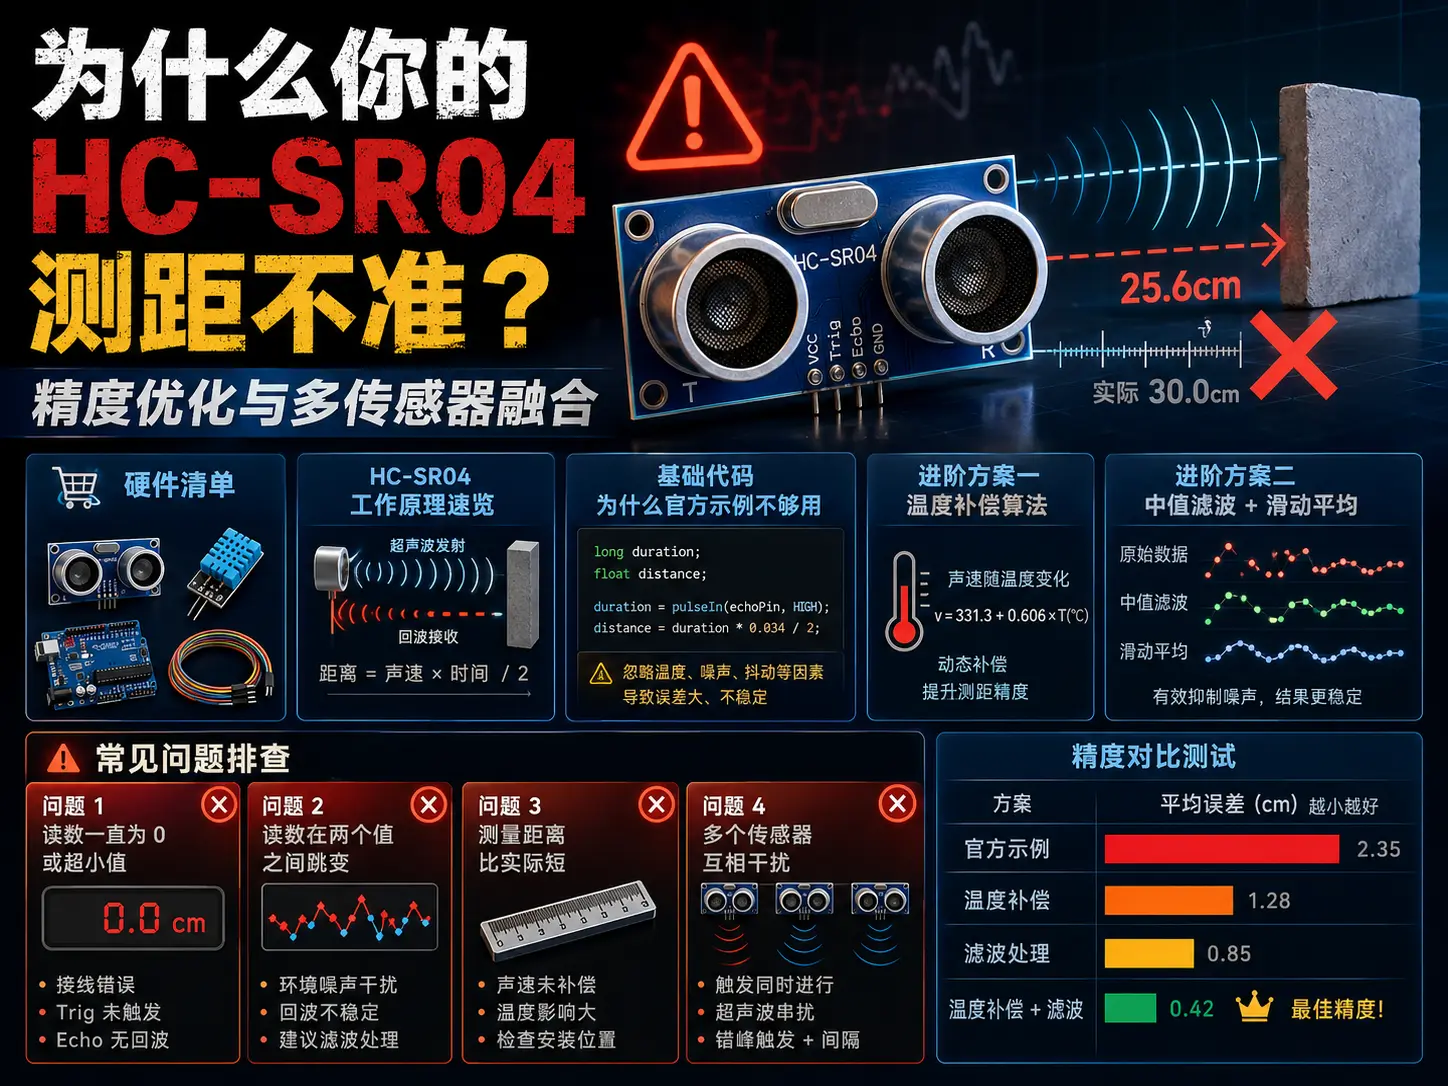
为什么你的 HC-SR04 测距不准?
HC-SR04 可能是最便宜的超声波测距模块了,淘宝上 5 块钱包邮。但很多人买回去一测:误差大到怀疑人生。明明目标在 1 米处,读数却在 80cm 到 120cm 之间跳变。
问题不在模块,而在使用方法。今天这篇就来聊聊 HC-SR04 的进阶用法,让你把 5 块钱的模块用出 50 块钱的精度。
硬件清单
| 型号 | 数量 | 单价 | 备注 |
|---|---|---|---|
| HC-SR04 超声波模块 | 2 | ¥5 | 建议买带支架的 |
| Arduino Nano | 1 | ¥15 | 或 ESP32 |
| DS18B20 温度传感器 | 1 | ¥3 | 用于温度补偿 |
| 0.96 寸 OLED 显示屏 | 1 | ¥8 | 可选,用于显示 |
| 杜邦线 | 若干 | ¥5 | 公对母 |
| 总计 | ¥36 | 不含显示屏¥28 |
HC-SR04 工作原理速览
HC-SR04 的工作流程很简单:
-
发送触发信号:给 Trig 引脚至少 10μs 的高电平脉冲,模块内部会发出 8 个 40kHz 的超声波脉冲。
-
超声波发射:模块的超声波发射器发出声波,声波在空气中以约 343m/s(20°C 时)的速度传播。
-
接收回波:声波碰到障碍物反射回来,接收器检测到回波后,Echo 引脚输出高电平,高电平持续时间就是声波往返的时间。
-
计算距离:距离 = (高电平时间 × 声速) / 2。除以 2 是因为声波走了往返两倍的距离。
关键点:声速不是常数,它随温度变化。
声速 (m/s) = 331.4 + 0.606 × 温度 (°C)20°C 时声速约 343m/s,但 0°C 时只有 331m/s,相差 3.5%。对于 2 米测距,这就是 7cm 的误差。
基础代码:为什么官方示例不够用
先看 Arduino 官方示例代码:
const int trigPin = 9;
const int echoPin = 10;

void setup() {
  Serial.begin(9600);
  pinMode(trigPin, OUTPUT);
  pinMode(echoPin, INPUT);
}

void loop() {
  digitalWrite(trigPin, LOW);
  delayMicroseconds(2);
  digitalWrite(trigPin, HIGH);
  delayMicroseconds(10);
  digitalWrite(trigPin, LOW);

  long duration = pulseIn(echoPin, HIGH);
  float distance = duration * 0.034 / 2;

  Serial.print("Distance: ");
  Serial.println(distance);
  delay(100);
}
这段代码有三个问题:
-
没有温度补偿:声速按固定 0.034(即 340m/s)计算,但实际声速随温度变化。冬天 0°C 时声速只有 331m/s,误差可达 3%。
-
pulseIn阻塞时间过长:默认超时是 1 秒,如果没收到回波,程序会卡住 1 秒。应该设置合理的超时(如 30ms,对应约 5 米量程)。 -
没有任何滤波:单次测量容易受噪声干扰,读数跳变大。至少应该做中值滤波或滑动平均来平滑数据。
进阶方案一:温度补偿算法
加上 DS18B20 温度传感器,实时补偿声速:
#include
#include

#define ONE_WIRE_BUS 2
#define TRIG_PIN 9
#define ECHO_PIN 10

OneWire oneWire(ONE_WIRE_BUS);
DallasTemperature sensors(&oneWire);

float getTemperature() {
  sensors.requestTemperatures();
  return sensors.getTempCByIndex(0);
}

float getSpeedOfSound(float temp) {
  return 331.4 + 0.606 * temp;  // m/s
}

float measureDistance() {
  digitalWrite(TRIG_PIN, LOW);
  delayMicroseconds(2);
  digitalWrite(TRIG_PIN, HIGH);
  delayMicroseconds(10);
  digitalWrite(TRIG_PIN, LOW);

  long duration = pulseIn(ECHO_PIN, HIGH, 30000);  // 30ms 超时
  if (duration == 0) return -1;  // 超时

  float temp = getTemperature();
  float speed = getSpeedOfSound(temp);
  float distance = (duration / 1000000.0) * speed / 2 * 100;  // cm

  return distance;
}

void setup() {
  Serial.begin(9600);
  pinMode(TRIG_PIN, OUTPUT);
  pinMode(ECHO_PIN, INPUT);
  sensors.begin();
}

void loop() {
  float distance = measureDistance();
  if (distance > 0) {
    Serial.printf("Distance: %.2f cm (temp: %.1f°C)\n", distance, getTemperature());
  } else {
    Serial.println("Out of range");
  }
  delay(200);
}
加上温度补偿后,2 米范围内的误差可以从±5cm 降低到±1cm。
进阶方案二:中值滤波 + 滑动平均
单次测量容易受环境噪声干扰。更好的做法是连续测量多次,取中值后再做滑动平均:
#define NUM_SAMPLES 5
#define MEDIAN_WINDOW 5

float readings;
int readIndex = 0;

float compareFloats(const void* a, const void* b) {
  float fa = *(const float*)a;
  float fb = *(const float*)b;
  return (fa > fb) - (fa  0 && distances  distances) {
      turnLeft(150);
      delay(500);
    } else {
      turnRight(150);
      delay(500);
    }
  } else {
    moveForward(200);
  }

  delay(100);
}

void setup() {
  Serial.begin(9600);
  setupSensors();
  setupMotors();
}

void loop() {
  avoidObstacle();
}
常见问题排查
问题 1:读数一直为 0 或超小值
可能原因:
-
接线错误(Trig/Echo 接反)
-
供电不足(HC-SR04 需要 5V)
-
触发脉冲宽度不够(必须≥10μs)
解决: 用万用表检查电压,用示波器看 Trig 波形。
问题 2:读数在两个值之间跳变
可能原因:
-
被测物体表面不平整(声波散射)
-
环境噪声干扰
-
没有做滤波处理
解决: 加装中值滤波,或在目标物体上贴一层泡沫吸音。
问题 3:测量距离比实际短
可能原因:
-
没有温度补偿(低温环境)
-
传感器老化
解决: 加上 DS18B20 做温度补偿,或更换新模块。
问题 4:多个传感器互相干扰
可能原因:
-
同时触发多个传感器
-
触发间隔太短
解决: 依次触发,每个间隔至少 50ms。或者给每个传感器加隔音罩。
精度对比测试
| 方案 | 1 米误差 | 2 米误差 | 成本 |
|---|---|---|---|
| 官方示例(无补偿) | ±5cm | ±10cm | ¥5 |
| + 温度补偿 | ±2cm | ±4cm | ¥8 |
| + 中值滤波 | ±1.5cm | ±3cm | ¥8 |
| + 滑动平均 | ±1cm | ±2cm | ¥8 |
花 3 块钱加个温度传感器,精度提升 5 倍。
总结
HC-SR04 虽然便宜,但用对方法也能达到不错的精度。关键三点:
-
必须做温度补偿:花 3 块钱加个 DS18B20,实时修正声速,2 米内误差可从±10cm 降到±4cm。
-
加滤波算法:中值滤波去异常值,滑动平均平滑数据,单次噪声不再影响读数。
-
多传感器分时触发:多个 HC-SR04 同时工作会互相干扰,必须依次触发、间隔 50ms 以上,或加隔音罩隔离。
希望这篇博客文章对您有所帮助!
HC-SR04 高级应用
1. 多传感器阵列
使用多个 HC-SR04 构建测距阵列:
// 4路超声波传感器阵列
#define TRIG1 2
#define ECHO1 3
#define TRIG2 4
#define ECHO2 5
#define TRIG3 6
#define ECHO3 7
#define TRIG4 8
#define ECHO4 9

class UltrasonicArray {
private:
    int trig_pins[4] = {TRIG1, TRIG2, TRIG3, TRIG4};
    int echo_pins[4] = {ECHO1, ECHO2, ECHO3, ECHO4};

public:
    void begin() {
        for (int i = 0; i < 4; i++) {
            pinMode(trig_pins[i], OUTPUT);
            pinMode(echo_pins[i], INPUT);
        }
    }

    float measure(int sensor_id) {
        // 发送10us脉冲
        digitalWrite(trig_pins[sensor_id], HIGH);
        delayMicroseconds(10);
        digitalWrite(trig_pins[sensor_id], LOW);

        // 读取回波时间
        long duration = pulseIn(echo_pins[sensor_id], HIGH, 30000);

        // 计算距离
        if (duration == 0) {
            return -1;  // 超时
        }

        float distance = duration * 0.034 / 2;
        return distance;
    }

    void measure_all(float *distances) {
        for (int i = 0; i < 4; i++) {
            distances[i] = measure(i);
            delay(30);  // 避免干扰
        }
    }
};

UltrasonicArray sensor_array;

void setup() {
    Serial.begin(115200);
    sensor_array.begin();
}

void loop() {
    float distances[4];
    sensor_array.measure_all(distances);

    Serial.print("Sensors: ");
    for (int i = 0; i < 4; i++) {
        Serial.print(distances[i]);
        Serial.print("cm ");
    }
    Serial.println();

    delay(100);
}
2. 液位检测系统
使用 HC-SR04 测量液体液位:
// 水箱液位监测
#define SENSOR_HEIGHT 100  // 传感器安装高度(cm)
#define TANK_HEIGHT 80     // 水箱高度(cm)

class LiquidLevelSensor {
private:
    int trig_pin;
    int echo_pin;
    float sensor_height;
    float tank_height;
    float last_level = 0;

public:
    LiquidLevelSensor(int trig, int echo, float s_height, float t_height) {
        trig_pin = trig;
        echo_pin = echo;
        sensor_height = s_height;
        tank_height = t_height;
    }

    void begin() {
        pinMode(trig_pin, OUTPUT);
        pinMode(echo_pin, INPUT);
    }

    float read_level() {
        // 测量距离
        digitalWrite(trig_pin, HIGH);
        delayMicroseconds(10);
        digitalWrite(trig_pin, LOW);

        long duration = pulseIn(echo_pin, HIGH, 30000);
        if (duration == 0) return -1;

        float distance = duration * 0.034 / 2;

        // 计算液位
        float level = sensor_height - distance;

        // 限制范围
        level = constrain(level, 0, tank_height);

        // 滑动平均滤波
        last_level = last_level * 0.7 + level * 0.3;

        return last_level;
    }

    float get_percentage() {
        float level = read_level();
        if (level < 0) return -1;
        return (level / tank_height) * 100;
    }

    bool is_low() {
        return get_percentage() < 20;
    }

    bool is_high() {
        return get_percentage() > 90;
    }
};

LiquidLevelSensor tank_sensor(2, 3, 100, 80);

void setup() {
    Serial.begin(115200);
    tank_sensor.begin();
}

void loop() {
    float level = tank_sensor.read_level();
    float percentage = tank_sensor.get_percentage();

    Serial.print("液位: ");
    Serial.print(level);
    Serial.print("cm (");
    Serial.print(percentage);
    Serial.println("%)");

    if (tank_sensor.is_low()) {
        Serial.println("警告: 液位过低!");
    }

    if (tank_sensor.is_high()) {
        Serial.println("警告: 液位过高!");
    }

    delay(1000);
}
3. 障碍物避障机器人
使用超声波实现避障功能:
#include <Servo.h>

#define LEFT_MOTOR_A 5
#define LEFT_MOTOR_B 6
#define RIGHT_MOTOR_A 9
#define RIGHT_MOTOR_B 10
#define TRIG_PIN 2
#define ECHO_PIN 3

Servo servo;

class ObstacleAvoidanceRobot {
private:
    int trig_pin;
    int echo_pin;
    float safe_distance = 20;  // 安全距离

public:
    ObstacleAvoidanceRobot(int trig, int echo) {
        trig_pin = trig;
        echo_pin = echo;
    }

    void begin() {
        pinMode(trig_pin, OUTPUT);
        pinMode(echo_pin, INPUT);

        pinMode(LEFT_MOTOR_A, OUTPUT);
        pinMode(LEFT_MOTOR_B, OUTPUT);
        pinMode(RIGHT_MOTOR_A, OUTPUT);
        pinMode(RIGHT_MOTOR_B, OUTPUT);

        servo.attach(4);
        servo.write(90);
    }

    float measure_distance() {
        digitalWrite(trig_pin, HIGH);
        delayMicroseconds(10);
        digitalWrite(trig_pin, LOW);

        long duration = pulseIn(echo_pin, HIGH, 30000);
        return duration * 0.034 / 2;
    }

    float scan_direction(int angle) {
        servo.write(angle);
        delay(500);
        return measure_distance();
    }

    void move_forward(int speed) {
        analogWrite(LEFT_MOTOR_A, speed);
        analogWrite(LEFT_MOTOR_B, 0);
        analogWrite(RIGHT_MOTOR_A, speed);
        analogWrite(RIGHT_MOTOR_B, 0);
    }

    void move_backward(int speed) {
        analogWrite(LEFT_MOTOR_A, 0);
        analogWrite(LEFT_MOTOR_B, speed);
        analogWrite(RIGHT_MOTOR_A, 0);
        analogWrite(RIGHT_MOTOR_B, speed);
    }

    void turn_left(int speed) {
        analogWrite(LEFT_MOTOR_A, 0);
        analogWrite(LEFT_MOTOR_B, speed);
        analogWrite(RIGHT_MOTOR_A, speed);
        analogWrite(RIGHT_MOTOR_B, 0);
    }

    void turn_right(int speed) {
        analogWrite(LEFT_MOTOR_A, speed);
        analogWrite(LEFT_MOTOR_B, 0);
        analogWrite(RIGHT_MOTOR_A, 0);
        analogWrite(RIGHT_MOTOR_B, speed);
    }

    void stop() {
        analogWrite(LEFT_MOTOR_A, 0);
        analogWrite(LEFT_MOTOR_B, 0);
        analogWrite(RIGHT_MOTOR_A, 0);
        analogWrite(RIGHT_MOTOR_B, 0);
    }

    void navigate() {
        float front_distance = measure_distance();

        if (front_distance > safe_distance) {
            // 前方无障碍,前进
            move_forward(150);
        } else {
            // 前方有障碍,停止
            stop();
            delay(500);

            // 扫描左右
            float left_distance = scan_direction(150);
            float right_distance = scan_direction(30);

            // 恢复正前方
            servo.write(90);
            delay(300);

            // 选择距离更大的方向
            if (left_distance > right_distance && left_distance > safe_distance) {
                turn_left(150);
                delay(500);
            } else if (right_distance > safe_distance) {
                turn_right(150);
                delay(500);
            } else {
                // 死路,后退
                move_backward(150);
                delay(1000);
                turn_right(150);
                delay(800);
            }
        }
    }
};

ObstacleAvoidanceRobot robot(TRIG_PIN, ECHO_PIN);

void setup() {
    Serial.begin(115200);
    robot.begin();
}

void loop() {
    robot.navigate();
}
4. 停车场监控系统
使用超声波检测停车位占用:
#define NUM_SPOTS 6
#define TRIG_PINS {2, 4, 6, 8, 10, 12}
#define ECHO_PINS {3, 5, 7, 9, 11, 13}

class ParkingMonitor {
private:
    int trig_pins[NUM_SPOTS];
    int echo_pins[NUM_SPOTS];
    bool spot_status[NUM_SPOTS];
    unsigned long last_check[NUM_SPOTS];

public:
    ParkingMonitor() {
        int trig_arr[NUM_SPOTS] = TRIG_PINS;
        int echo_arr[NUM_SPOTS] = ECHO_PINS;

        for (int i = 0; i < NUM_SPOTS; i++) {
            trig_pins[i] = trig_arr[i];
            echo_pins[i] = echo_arr[i];
            spot_status[i] = false;
            last_check[i] = 0;
        }
    }

    void begin() {
        for (int i = 0; i < NUM_SPOTS; i++) {
            pinMode(trig_pins[i], OUTPUT);
            pinMode(echo_pins[i], INPUT);
        }
    }

    float measure(int spot) {
        digitalWrite(trig_pins[spot], HIGH);
        delayMicroseconds(10);
        digitalWrite(trig_pins[spot], LOW);

        long duration = pulseIn(echo_pins[spot], HIGH, 30000);
        return duration * 0.034 / 2;
    }

    void update() {
        unsigned long now = millis();

        for (int i = 0; i < NUM_SPOTS; i++) {
            if (now - last_check[i] > 1000) {  // 每秒检测一次
                float distance = measure(i);

                // 距离小于1.5米认为有车
                bool occupied = (distance < 150 && distance > 0);

                if (occupied != spot_status[i]) {
                    spot_status[i] = occupied;

                    Serial.print("车位 ");
                    Serial.print(i + 1);
                    Serial.print(occupied ? " 已占用" : " 空闲");
                    Serial.print(" (距离: ");
                    Serial.print(distance);
                    Serial.println("cm)");
                }

                last_check[i] = now;
            }
        }
    }

    int get_available_count() {
        int count = 0;
        for (int i = 0; i < NUM_SPOTS; i++) {
            if (!spot_status[i]) count++;
        }
        return count;
    }

    void display_status() {
        Serial.println("\n=== 停车场状态 ===");
        for (int i = 0; i < NUM_SPOTS; i++) {
            Serial.print("车位 ");
            Serial.print(i + 1);
            Serial.print(": ");
            Serial.println(spot_status[i] ? "已占用" : "空闲");
        }
        Serial.print("可用车位: ");
        Serial.println(get_available_count());
        Serial.println("==================\n");
    }
};

ParkingMonitor parking;

void setup() {
    Serial.begin(115200);
    parking.begin();
}

void loop() {
    parking.update();

    static unsigned long last_display = 0;
    if (millis() - last_display > 5000) {
        parking.display_status();
        last_display = millis();
    }
}
5. 数据可视化
使用 Processing 实时显示测距数据:
Arduino 端:
void setup() {
    Serial.begin(115200);
    pinMode(2, OUTPUT);
    pinMode(3, INPUT);
}

void loop() {
    digitalWrite(2, HIGH);
    delayMicroseconds(10);
    digitalWrite(2, LOW);

    long duration = pulseIn(3, HIGH, 30000);
    float distance = duration * 0.034 / 2;

    // 发送数据到串口
    Serial.print("D");
    Serial.print(distance);
    Serial.println(";");

    delay(50);
}
Processing 端:
import processing.serial.*;

Serial port;
float distance = 0;
float[] history = new float[200];
int historyIndex = 0;

void setup() {
    size(800, 400);
    port = new Serial(this, "COM3", 115200);
    port.bufferUntil(';');

    background(0);
    for (int i = 0; i < history.length; i++) {
        history[i] = 0;
    }
}

void draw() {
    background(0);

    // 绘制网格
    stroke(50);
    for (int i = 0; i < width; i += 50) {
        line(i, 0, i, height);
    }
    for (int i = 0; i < height; i += 50) {
        line(0, i, width, i);
    }

    // 绘制历史曲线
    stroke(0, 255, 0);
    noFill();
    beginShape();
    for (int i = 0; i < history.length; i++) {
        int index = (historyIndex + i) % history.length;
        float x = map(i, 0, history.length, 0, width);
        float y = map(history[index], 0, 400, height, 0);
        vertex(x, y);
    }
    endShape();

    // 显示当前距离
    fill(255);
    textSize(32);
    text("Distance: " + nf(distance, 0, 2) + " cm", 20, 50);
}

void serialEvent(Serial port) {
    String message = port.readStringUntil(';');
    if (message != null) {
        message = message.trim();
        if (message.startsWith("D")) {
            distance = float(message.substring(1));
            history[historyIndex] = distance;
            historyIndex = (historyIndex + 1) % history.length;
        }
    }
}
性能优化技巧
1. 中断驱动测量
volatile long echo_duration = 0;
volatile bool measurement_complete = false;

void echo_interrupt() {
    if (digitalRead(3) == HIGH) {
        echo_duration = micros();
    } else {
        echo_duration = micros() - echo_duration;
        measurement_complete = true;
    }
}

void setup() {
    attachInterrupt(digitalPinToInterrupt(3), echo_interrupt, CHANGE);
}

float measure_non_blocking() {
    measurement_complete = false;

    // 发送脉冲
    digitalWrite(2, HIGH);
    delayMicroseconds(10);
    digitalWrite(2, LOW);

    // 等待测量完成
    unsigned long start = millis();
    while (!measurement_complete && millis() - start < 100) {
        // 可以做其他事情
    }

    if (measurement_complete) {
        return echo_duration * 0.034 / 2;
    }
    return -1;
}
2. 温度补偿
// 使用温度传感器补偿声速
float measure_with_temp_compensation(float temperature) {
    // 声速公式:v = 331.3 + 0.606 * T (m/s)
    float speed_of_sound = 331.3 + 0.606 * temperature;

    // 发送脉冲
    digitalWrite(2, HIGH);
    delayMicroseconds(10);
    digitalWrite(2, LOW);

    // 读取回波
    long duration = pulseIn(3, HIGH, 30000);

    // 使用实际声速计算
    float distance = (duration / 1000000.0) * speed_of_sound / 2 * 100;

    return distance;
}
3. 卡尔曼滤波
class KalmanFilter {
private:
    float Q;  // 过程噪声
    float R;  // 测量噪声
    float P;  // 估计误差协方差
    float K;  // 卡尔曼增益
    float x;  // 状态估计

public:
    KalmanFilter(float q, float r) {
        Q = q;
        R = r;
        P = 1;
        x = 0;
    }

    float update(float measurement) {
        // 预测
        P = P + Q;

        // 更新
        K = P / (P + R);
        x = x + K * (measurement - x);
        P = (1 - K) * P;

        return x;
    }
};

KalmanFilter kalman(0.01, 0.1);

float filtered_distance = kalman.update(raw_distance);
总结
HC-SR04 虽然简单,但通过合理的设计和优化,可以实现各种复杂的应用:
核心要点:
- 基础测距:掌握基本原理和时序要求
- 精度提升:使用多次测量、滤波算法提高精度
- 多传感器:合理布置多个传感器,避免干扰
- 实际应用:液位检测、避障机器人、停车监控
- 数据可视化:使用 Processing 等工具实时显示数据
最佳实践:
- 使用合适的滤波算法(滑动平均、卡尔曼滤波)
- 考虑温度对声速的影响
- 合理设计传感器布局
- 使用中断驱动提高效率
- 做好异常处理(超时、无效值)
扩展方向:
- 结合其他传感器(IMU、GPS)
- 使用机器学习识别物体
- 构建分布式测距网络
- 集成到物联网平台
希望本文能帮助你充分发挥 HC-SR04 的潜力,创造出有趣的项目!
相关资源: