 人工智能
人工智能 CoLab - 图像人脸检测_框出人脸
此文章教你如何使用谷歌Colaboratory实现静止图片的人脸识别和划框框。
CoLab最大好处:GPU计算速度快!
注:
· 国内登陆Colab需使用到梯梯才能使用;
· 初次接触Colab同学请先自行搜索熟悉基本操作;
· 同学们可自行尝试将代码放到Jetson Nano环境,或其他具备GPU环境运行;
· ipynb格式的教程传送门在此。
准备工作& 安装库
1) CoLab开启GPU支持
上方菜单栏 ➡ 代码执行程序 ➡ 更改运行时类型 ➡ 笔记本设置 ➡ 硬件加速器:GPU
2) 安装:依赖项
通过apt安装一些基本库,为了支持numpy和dlib的运行 (注:CuLab内置已经有numpy)
!sudo apt-get update
!sudo apt-get install python3-pip cmake libopenblas-dev liblapack-dev libjpeg-dev
!pip3 install numpy
3) 安装:Dlib深度学习库
大师Davis King创建的深度学习库,使得face_recognition库的运行效率大大提高。
下载dlib,解压代码,安装dlib (CuLab环境下安装需10分钟左右,耐心等待一下)
!wget http://dlib.net/files/dlib-19.17.tar.bz2
!tar jxvf dlib-19.17.tar.bz2
!cd dlib-19.17;python setup.py install
4) 安装:人脸识别库 Face_recognition
以上完成之后,我们就开始安装人脸识别python库face_recognition啦:
!sudo pip3 install face_recognition加载大神Adam Geitgey在GitHub的源代码文档
!git clone https://github.com/ageitgey/face_recognition.git(一)人脸划框框(一步步教你玩)
加载人脸识别、OpenCV和MatPlotlib库
import face_recognition
import cv2
import matplotlib.pyplot as plt
首先我们先下载一张复仇联盟合照,将其图片Wget下载到“文件”根目录下,并修改命名为avengers_cast.jpeg
然后通过load_image_file可以将图片文件转变为数组数据,利用MatPlotlib的imshow来输出原图像。
!wget https://www.cheatsheet.com/wp-content/uploads/2019/05/The-Avengers-Cast-640x427.jpg -O avengers_cast.jpegimage = face_recognition.load_image_file("/content/avengers_cast.jpeg")
plt.imshow(image)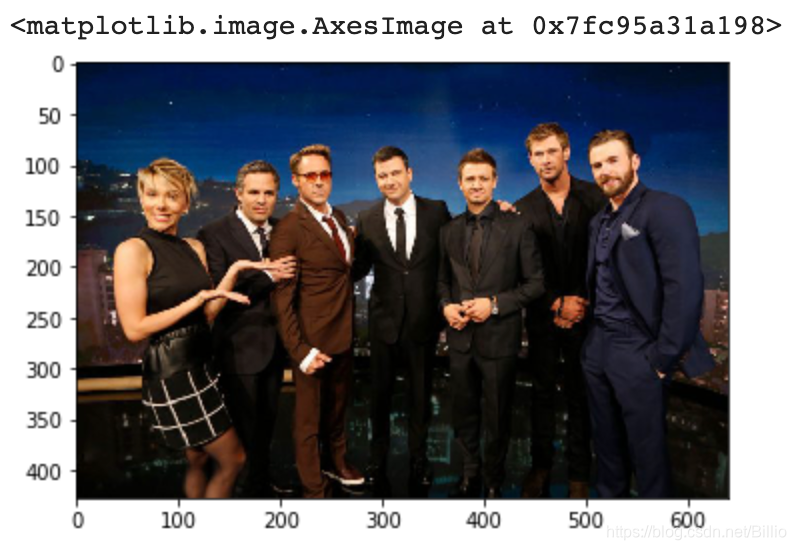 face_locations模块对图像数据进行处理,定位人脸位置:四值 ➡ 两坐标: y1,x1,y2,x2
face_locations = face_recognition.face_locations(image)
#统计出一共多少人脸数
print("图像检测到人脸数:", len(face_locations))
#输出所有人脸定位数据
print (face_locations)
得到以下结果:
**
图像检测到人脸数: 7 [(118, 197, 154, 161), (98, 325, 134, 289), (98, 253, 134, 217), (103, 415, 146, 371), (84, 544, 127, 501), (78, 481, 114, 445), (118, 103, 161, 59)]
利用cv2的rectangle函数进行画框: 参考函数讲解OpenCV Python 2D绘制矩形
#为第一个人脸画框(注意xy轴数值输入顺序)
img_test = cv2.rectangle(image, (face_locations[0][1], face_locations[0][0]), (face_locations[0][3], face_locations[0][2]), (255,0,0),5)
#输出效果图像
plt.imshow(img_test)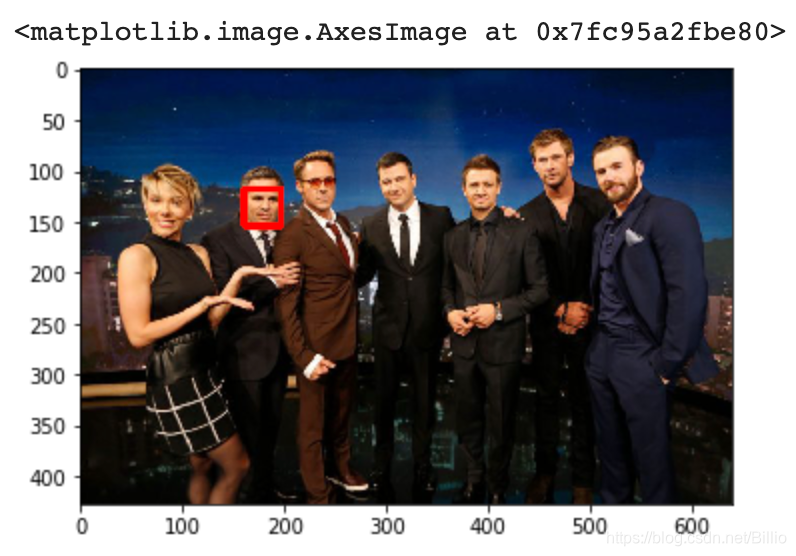 编写循环语句,为所有人脸画框:
#为所有人脸画框
for i in face_locations:
img1_detect = cv2.rectangle(image, (i[1], i[0]), (i[3], i[2]), (255,0,0),5)
#输出效果图像
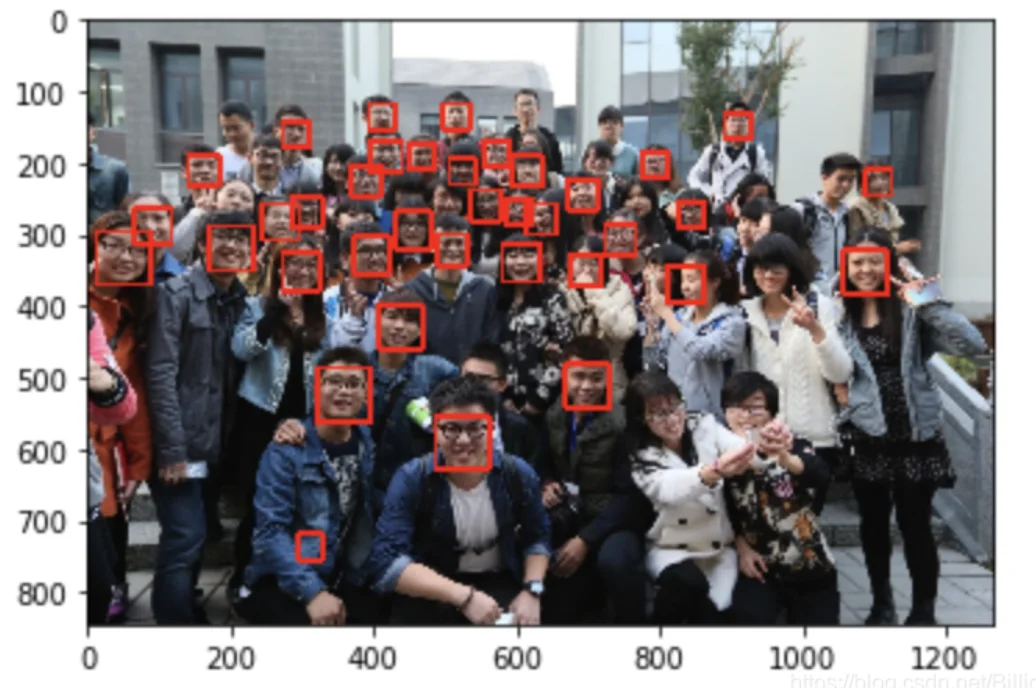
plt.imshow(img1_detect)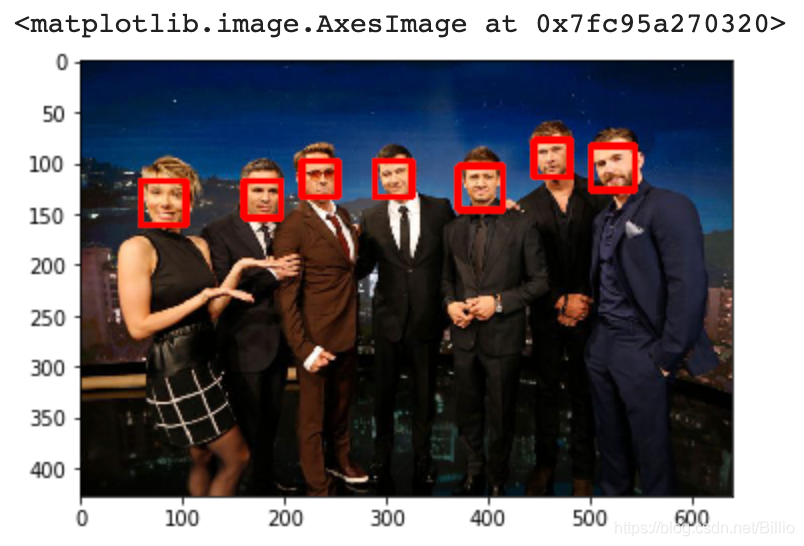 接下来,我再找多个案例来试试:马爸爸与校友合照
#案例2:下载图片
!wget http://5b0988e595225.cdn.sohucs.com/images/20180513/0b958761ba0f4b99b35747ac656f4ec4.jpeg -O Jack_Ma_schoolmates.jpeg
#将图片数据化赋值到img2
img2 = face_recognition.load_image_file("/content/Jack_Ma_schoolmates.jpeg")
#识别人脸数据
face_locations_img2 = face_recognition.face_locations(img2)
#为所有人脸画框
for i in face_locations_img2:
img2_detect = cv2.rectangle(img2, (i[1], i[0]), (i[3], i[2]), (255,0,0), 5)
#输出效果图像
plt.imshow(img2_detect)
#统计出一共多少人脸数
print("图像总人脸数:", len(face_locations_img2))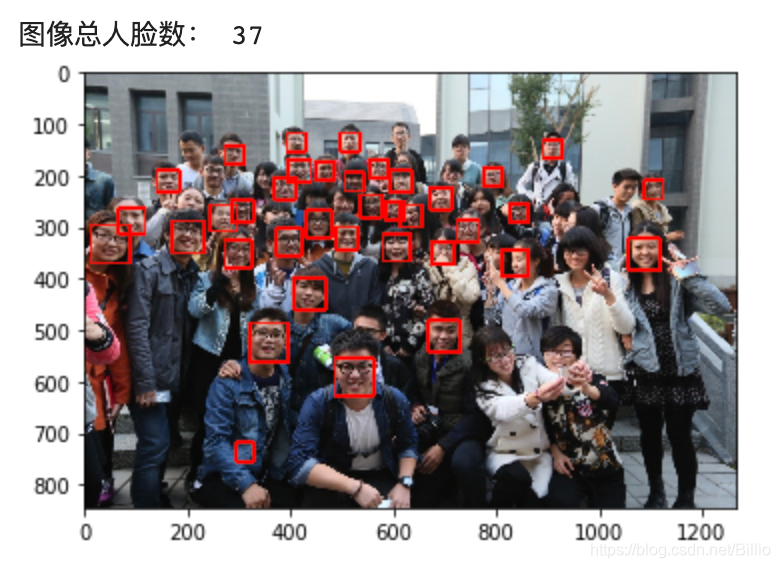 以上例子就能发现,这人脸识别并不完美:
部分同学未被识别入框,且前排蓝色衣服同学某衣服处竟然被错认为是人脸!
为什么会这样子?是因为本项目的人脸识别是基于C++开源库dlib中的深度学习模型,用Labeled Faces in the Wild人脸数据集进行训练,这个库的人脸数据几乎都是外国成人…… 因此,
此人脸识别模型对亚洲人和小孩脸的识别准确率尚待提升**。
代码完整解析
让我们更详细地了解一下上面代码中每个步骤的原理。
face_recognition库的工作原理
face_recognition库基于dlib的深度学习模型,工作流程如下:
- 人脸检测:使用HOG(方向梯度直方图)特征或CNN卷积神经网络在图片中找到人脸区域
- 人脸对齐:检测68个人脸关键点(眼睛、鼻子、嘴巴轮廓等),将人脸对齐到标准位置
- 特征提取:将对齐后的人脸通过深度学习模型提取128维特征向量
- 人脸比对:通过计算两张人脸的欧氏距离来判断是否为同一人(距离越小越相似)
face_locations函数的参数说明
face_locations = face_recognition.face_locations(image, number_of_times_to_upsample=1, model="hog")number_of_times_to_upsample:对图片进行上采样的次数,数值越大能检测到越小的脸,但速度越慢。默认值为1,如果图片中人脸很小可以改为2model:检测模型,"hog"速度快但对侧脸效果差,"cnn"准确度更高但需要GPU支持。在Colab中建议使用"cnn"模式
# 使用CNN模式(更准确)
face_locations = face_recognition.face_locations(image, model="cnn")
给识别结果添加标签
上面的例子只是画出了人脸框,接下来我们学习如何给每个识别到的人脸添加姓名标签:
import face_recognition
import cv2
import matplotlib.pyplot as plt
import numpy as np

# 加载图片
image = face_recognition.load_image_file("/content/avengers_cast.jpeg")

# 检测人脸位置
face_locations = face_recognition.face_locations(image)

# 获取每个人脸的特征编码(128维向量)
face_encodings = face_recognition.face_encodings(image, face_locations)

# 复制一份图片用于绘制
image_with_labels = image.copy()

# 预设的人名列表(需要与实际检测到的人脸对应)
# 实际应用中,你需要先用已知人物的照片训练出对应的编码
known_names = ["Actor1", "Actor2", "Actor3", "Actor4", "Actor5", "Actor6", "Actor7"]

for i, (face_encoding, face_loc) in enumerate(zip(face_encodings, face_locations)):
    top, right, bottom, left = face_loc

    # 获取名字(如果没有预设,就显示"Unknown")
    name = known_names[i] if i < len(known_names) else "Unknown"

    # 画人脸框(红色)
    cv2.rectangle(image_with_labels, (left, top), (right, bottom), (255, 0, 0), 3)

    # 画标签背景(蓝色矩形)
    cv2.rectangle(image_with_labels, (left, bottom - 25), (right, bottom), (0, 0, 255), cv2.FILLED)

    # 写入名字
    font = cv2.FONT_HERSHEY_DUPLEX
    cv2.putText(image_with_labels, name, (left + 6, bottom - 6), font, 0.6, (255, 255, 255), 1)

plt.figure(figsize=(12, 8))
plt.imshow(image_with_labels)
plt.axis('off')
plt.show()
与其他人脸检测方法的对比
face_recognition并不是唯一的人脸检测方案,让我们对比一下几种常见方法:
OpenCV Haar级联分类器
OpenCV自带的人脸检测器,基于Haar特征:
import cv2

# 加载Haar级联分类器
face_cascade = cv2.CascadeClassifier(cv2.data.haarcascades + 'haarcascade_frontalface_default.xml')

# 读取图片并转灰度
image = cv2.imread("/content/avengers_cast.jpeg")
gray = cv2.cvtColor(image, cv2.COLOR_BGR2GRAY)

# 检测人脸
faces = face_cascade.detectMultiScale(gray, scaleFactor=1.1, minNeighbors=5, minSize=(30, 30))

print(f"检测到 {len(faces)} 个人脸")

for (x, y, w, h) in faces:
    cv2.rectangle(image, (x, y), (x+w, y+h), (0, 255, 0), 3)

# OpenCV用BGR显示,Matplotlib需要RGB
plt.imshow(cv2.cvtColor(image, cv2.COLOR_BGR2RGB))
plt.show()Haar级联的优缺点:
- 优点:速度极快,不需要深度学习库,OpenCV自带
- 缺点:准确率低,侧脸和遮挡情况下表现差,只能检测不能识别
MediaPipe Face Detection
Google的MediaPipe框架,适合移动端和实时场景:
# 安装MediaPipe
!pip install mediapipe

import mediapipe as mp
import cv2

mp_face_detection = mp.solutions.face_detection
mp_drawing = mp.solutions.drawing_utils

image = cv2.imread("/content/avengers_cast.jpeg")
image_rgb = cv2.cvtColor(image, cv2.COLOR_BGR2RGB)

with mp_face_detection.FaceDetection(model_selection=1, min_detection_confidence=0.5) as face_detection:
    results = face_detection.process(image_rgb)

    if results.detections:
        print(f"检测到 {len(results.detections)} 个人脸")
        for i, detection in enumerate(results.detections):
            bbox = detection.location_data.relative_bounding_box
            h, w, _ = image.shape
            x, y = int(bbox.xmin * w), int(bbox.ymin * h)
            width, height = int(bbox.width * w), int(bbox.height * h)
            cv2.rectangle(image, (x, y), (x+width, y+height), (0, 255, 0), 3)

plt.imshow(cv2.cvtColor(image, cv2.COLOR_BGR2RGB))
plt.show()MediaPipe的优缺点:
- 优点:速度快,适合实时视频,支持人脸关键点检测
- 缺点:只能检测不能直接识别身份
三种方法总结对比
| 特性 | face_recognition (dlib) | OpenCV Haar | MediaPipe |
|---|---|---|---|
| 检测速度 | 中等 | 极快 | 快 |
| 检测准确率 | 高 | 中等 | 高 |
| 能否识别身份 | ✅ 能 | ❌ 不能 | ❌ 不能 |
| GPU加速 | 需要(CNN模式) | 不需要 | 可选 |
| 亚洲人脸准确率 | 中等 | 中等 | 较高 |
| 适合场景 | 人脸识别、门禁 | 简单计数 | 实时视频 |
在Colab之外运行:本地和Jetson Nano部署
本地电脑运行
以上代码在本地电脑上也能运行,只需注意以下几点:
# 1. 安装Python依赖
pip3 install face_recognition opencv-python matplotlib numpy

# 2. 如果安装face_recognition报错,需要先安装dlib
# macOS
brew install cmake
brew install openblas

# Ubuntu/Debian
sudo apt install cmake libopenblas-dev liblapack-dev libjpeg-dev

# Windows
# 推荐使用预编译的dlib wheel文件:
# pip install dlib-19.xx-cpxx-cpxx-win_amd64.whl(从GitHub releases下载)

pip3 install dlib
pip3 install face_recognition本地运行的代码与Colab几乎完全相同,只需要把!wget下载图片的命令替换为本地文件路径即可。
在Jetson Nano上运行
Jetson Nano自带GPU加速,非常适合做实时人脸识别。但安装过程有一些注意事项:
# 1. 确保已安装JetPack(推荐4.3及以上版本)
# 2. 安装系统依赖
sudo apt update
sudo apt install python3-pip cmake libopenblas-dev liblapack-dev libjpeg-dev

# 3. 安装numpy(JetPack通常已自带)
pip3 install numpy

# 4. 编译安装dlib(Jetson Nano上需要约30分钟)
# 建议开启最大CPU核心数以加速编译
wget http://dlib.net/files/dlib-19.17.tar.bz2
tar jxvf dlib-19.17.tar.bz2
cd dlib-19.17
python3 setup.py install --yes USE_AVX_INSTRUCTIONS

# 5. 安装face_recognition
pip3 install face_recognition

# 6. 安装OpenCV(JetPack自带或单独安装)
sudo apt install python3-opencv
Jetson Nano实时人脸检测示例:
import face_recognition
import cv2

# 打开USB摄像头
video_capture = cv2.VideoCapture(0)

while True:
    # 读取一帧(缩小尺寸以加速)
    ret, frame = video_capture.read()
    if not ret:
        break

    # 将帧缩小到1/4大小以加速处理
    small_frame = cv2.resize(frame, (0, 0), fx=0.25, fy=0.25)

    # 转换为RGB(OpenCV默认BGR)
    rgb_small_frame = small_frame[:, :, ::-1]

    # 检测人脸
    face_locations = face_recognition.face_locations(rgb_small_frame)

    # 在原始帧上画出人脸框(坐标需要乘以4还原)
    for (top, right, bottom, left) in face_locations:
        top *= 4
        right *= 4
        bottom *= 4
        left *= 4
        cv2.rectangle(frame, (left, top), (right, bottom), (0, 0, 255), 2)

    # 显示结果
    cv2.imshow('Face Detection', frame)

    # 按q键退出
    if cv2.waitKey(1) & 0xFF == ord('q'):
        break

video_capture.release()
cv2.destroyAllWindows()
在Jetson Nano上运行实时人脸识别时,帧率大约在2-5 FPS左右。如果需要更高帧率,可以使用dlib的HOG模式代替CNN模式,或者使用MediaPipe等更轻量的方案。
希望这些补充内容能帮助你更全面地了解人脸检测技术,并能灵活地在不同平台上应用!